10 Agile Teams
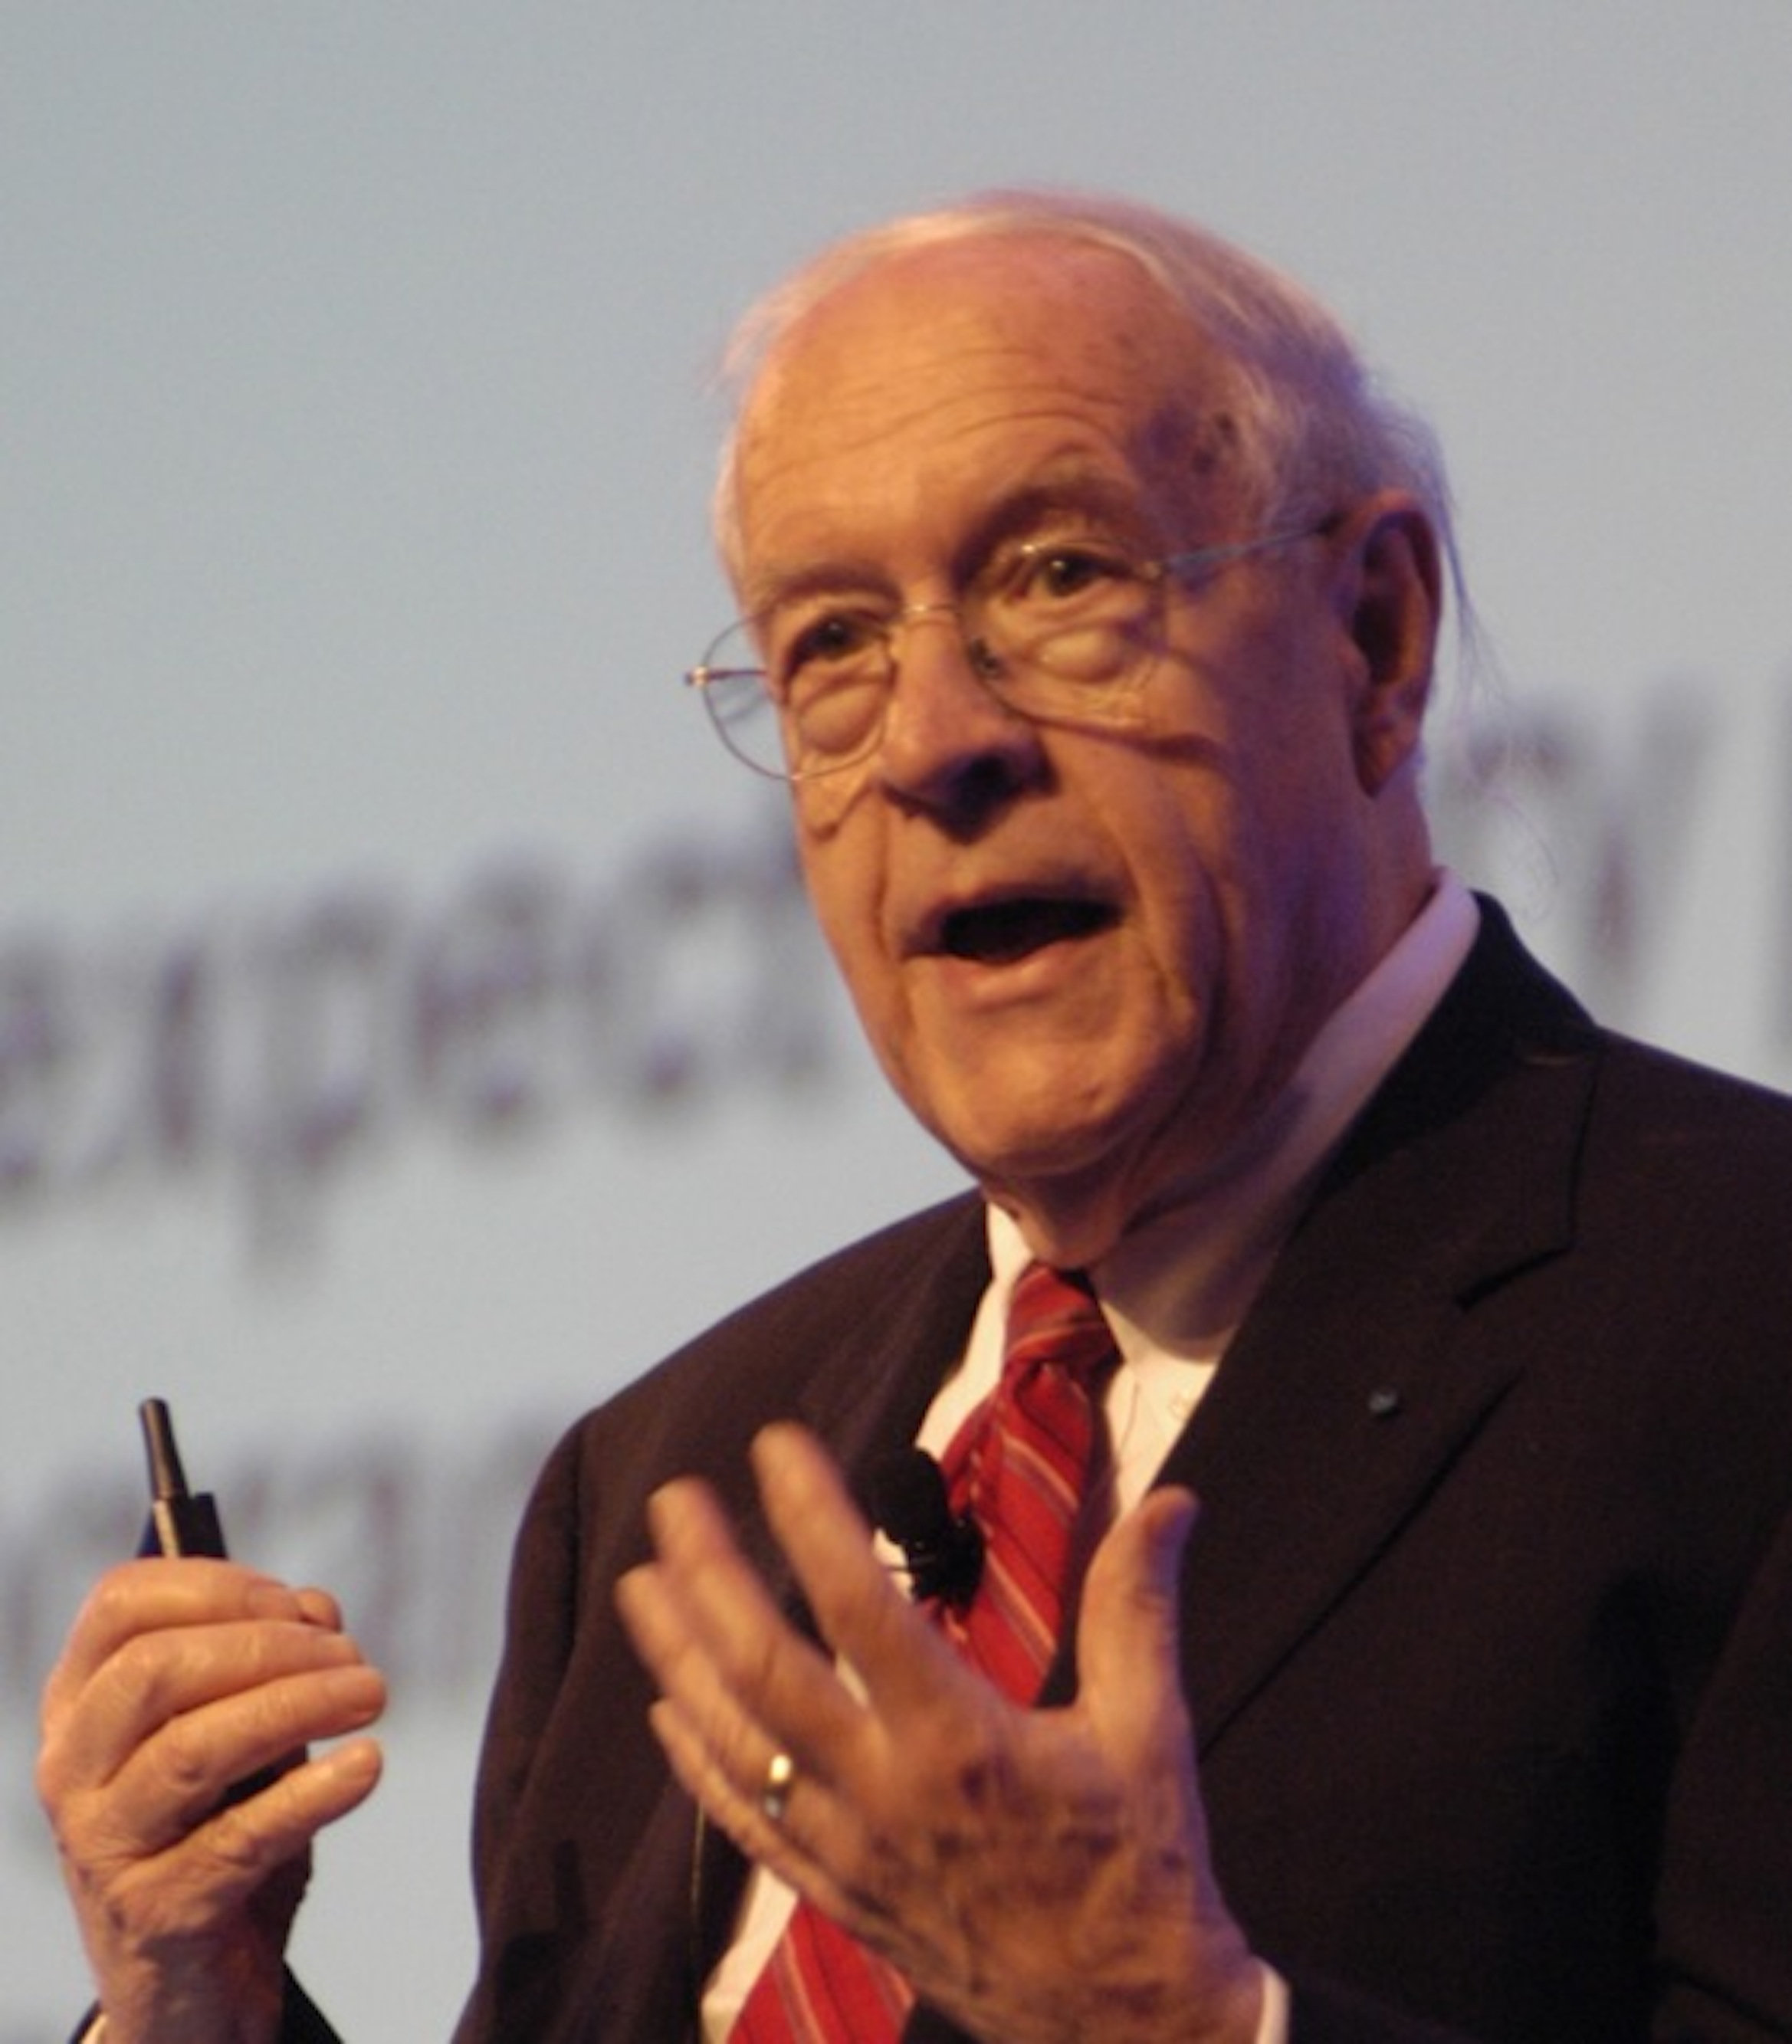
Frederick P. “Fred” Brooks, Jr. (1931–2022) wrote the classic software engineering book The Mythical Man-Month based on his years leading OS/360, the operating system for the highly successful IBM System/360 family of computers. This family was the first to feature instruction set compatibility across models, making it the first system to which the term “computer architecture” could be meaningfully applied. Brooks received the 1999 Turing Award for landmark contributions to computer architecture, operating systems, and software engineering.
There are no winners on a losing team, and no losers on a winning team.
— Fred Brooks, quoting North Carolina basketball coach Dean Smith, 1990
Prerequisites
You should have a free GitHub account and be comfortable with the basic Git operations and commands for solo work: creating a new repo in your development environment and pushing it to GitHub, cloning an existing repo from GitHub to your development environment, adding and removing files in a repo, committing changes accompanied by descriptive log messages, and pushing your changes to GitHub. Even if your Integrated Development Environments (IDEs) provides buttons and menus for interacting with Git and GitHub, you need to be comfortable doing these operations from the command line.
To learn or refresh these skills, we recommend this basic Git guide (developed for UC Berkeley CS61B Data Structures).
Concepts
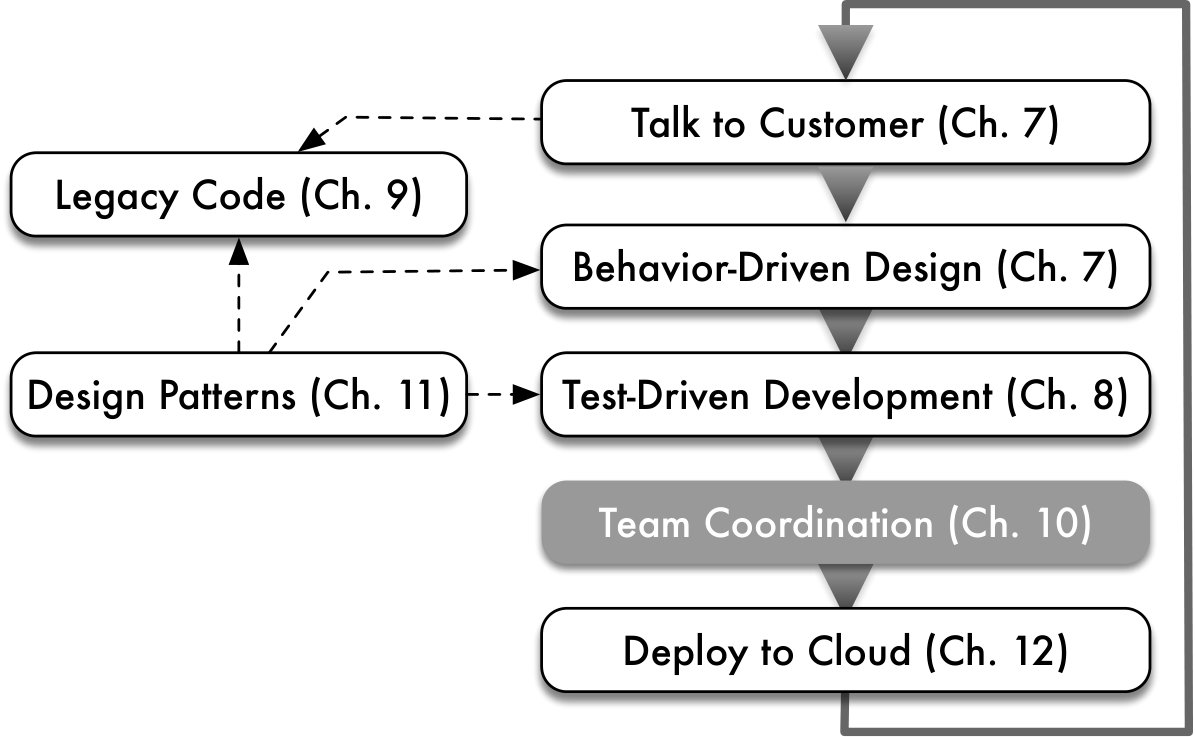
Whether Agile or Plan-and-Document, programming is now primarily a team sport. This chapter covers techniques that can help teams succeed in coordinating and delivering their work. All software teams rely on version control to manage code and configuration data, code reviews to ensure quality, release management to ship new versions, and change management while maintaining a shipped product, but the processes around these activities differ between Agile and P&D teams. The version of these concepts for Agile is:
“Two-pizza” teams are four to nine people in size.
Self-organizing teams follow the Scrum model, which relies on one teammate to act as the Product Owner, who represents the customer, and one to act as the Scrum Lead, who acts as a buffer between the team and external distractions. These roles rotate between the team members over time.
Code reviews occur continuously, often as the result of pull requests, which start the process of integrating new team contributions into the mainline code.
For the Plan-and-Document lifecycle, you will become familiar with the same concepts from a different perspective:
The project manager writes the contract, interfaces with the customer and upper management, recruits and manages the development team, resolves conflicts, and documents the plans for managing configurations and the project itself.
While group sizes are similar to Agile, large teams can be created by combining groups into a hierarchy under the project manager, with each group having its own leader.
10.1 It Takes a Team: Two-Pizza and Scrum
The Six Phases of a Project: (1) Enthusiasm, (2) Disillusionment, (3) Panic, (4) Search for the guilty, (5) Punishment of the innocent, (6) Praise for non-participants.
— Dutch Holland ((Holland 2004))
The days of the hero programmer are now past. Whereas once a brilliant individual could create breakthrough software, the rising bar on functionality and quality means software development is now primarily a team sport. Hence, success today means that not only do you have great design and coding skills, but that you work well with others and can help your team succeed. As the opening quote from Fred Brooks states, you cannot win if your team loses, and you cannot lose if your team wins.
Jeff Bezos, the CEO of Amazon who received his college degree in computer science, coined the two-pizza characterization of team size.
Hence, the first step of a software development project is to form and organize a team. As to its size, a “two-pizza” team—a group that can be fed by two pizzas in a meeting—is typical for SaaS projects. Our discussions with senior software engineers suggest the typical team size varies by company, with four to nine developers being a typical range.
While there are many ways to organize a two-pizza team, a popular one today is Scrum ((Schwaber and Beedle 2001)). Its frequent short meetings—15 minutes every day at the same place and time—inspire the name. During the scrum, each team member answers three questions:
What have you done since yesterday?
What are you planning to do today?
Are there any impediments or stumbling blocks?
The benefit of these daily scrums is that by understanding what each team member is doing and has already completed, the team can identify work that would help others make faster progress. Indeed, daily scrums are sometimes referred to as standups, implying that the meeting should be kept short enough that everyone can remain standing the entire time.
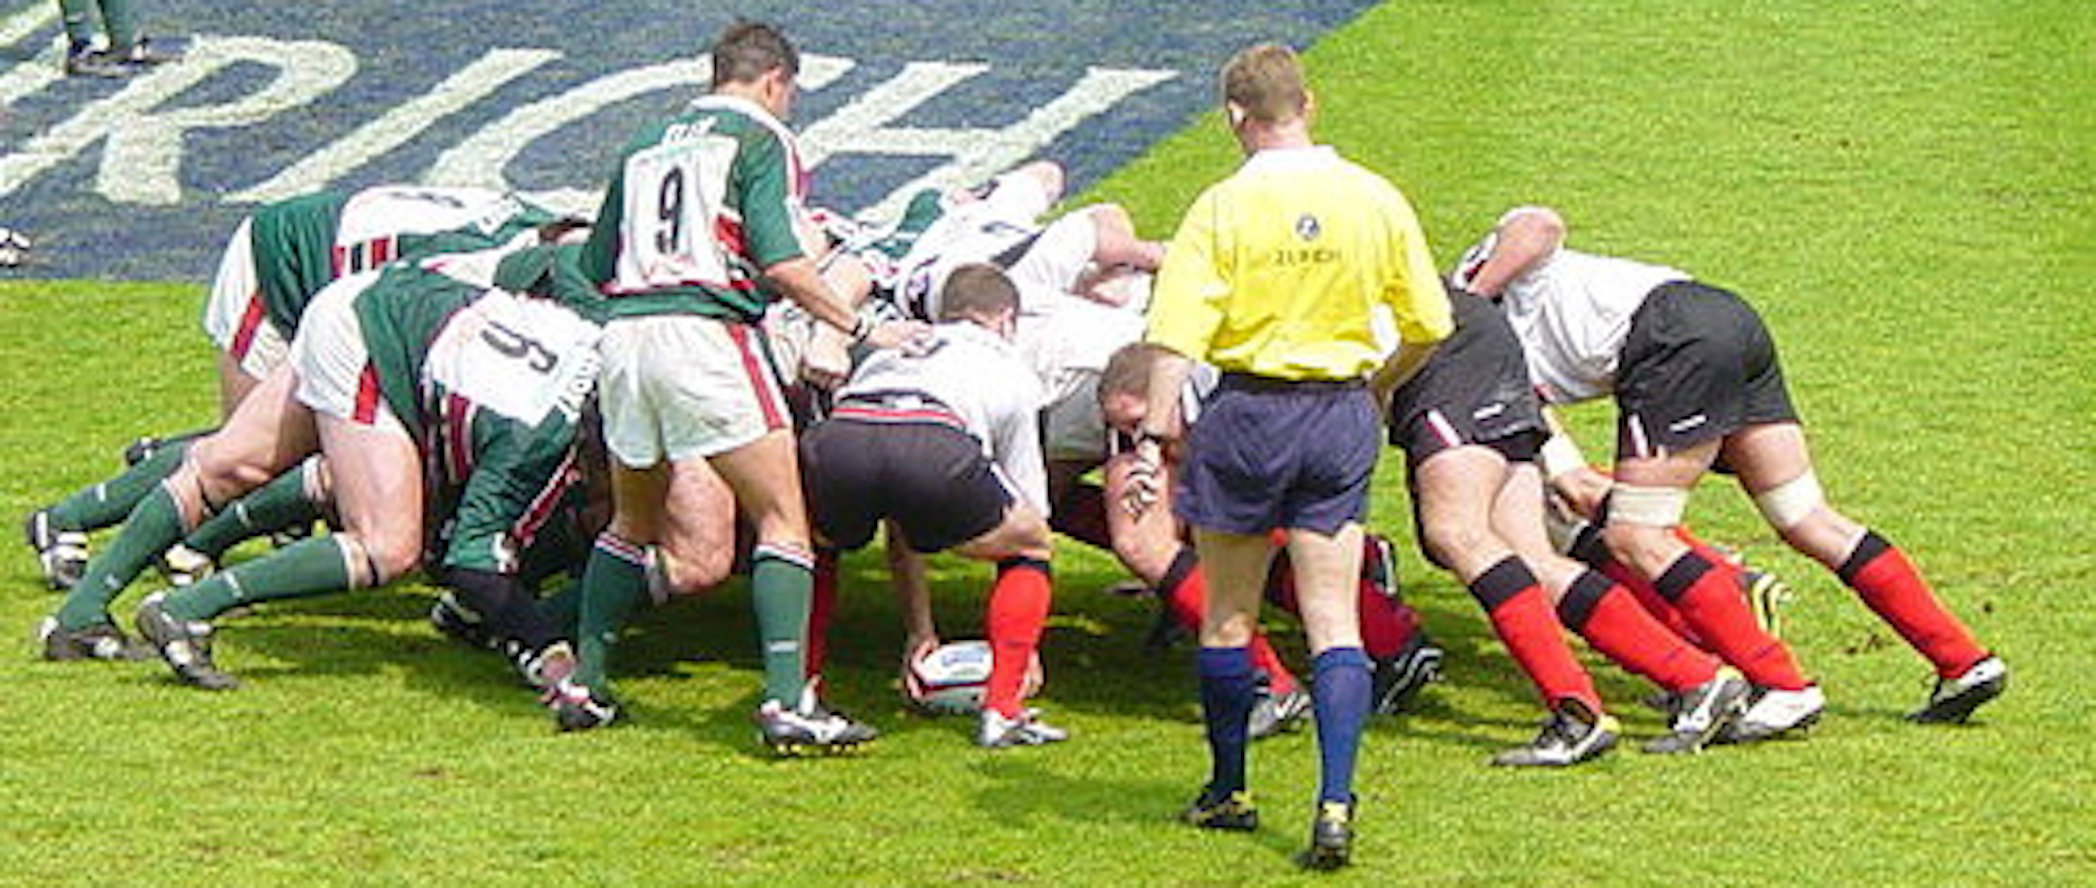
A scrum is held on every minor infraction in the sport of rugby. The game stops to bring the players together for a quick “meeting” in order to restart the game.
When combined with the weekly or biweekly iteration model of Agile to collect the feedback from all the stakeholders, the Scrum organization makes it more likely that the rapid progress will be towards what the customers want. Rather than use the Agile term iteration, Scrum uses the term sprint.
A Scrum has three main roles:
Team—A two-pizza size team that delivers the software.
Scrum Lead—A team member who acts as buffer between the Team and external distractions, keeps the team focused on the task at hand, enforces team rules, and removes impediments that prevent the team from making progress. One example is enforcing coding standards, which are style guidelines that improve the consistency and readability of the code.
Product Owner—A team member (not the Scrum Lead) who represents the voice of the customer and prioritizes user stories.
Scrum relies on self-organization, and team members often rotate through different roles. For example, we recommend that each team member rotate through the Product Owner role, changing on every iteration or sprint.
In any group working together, conflicts can occur around which technical direction the group should go. Depending in part on the personalities of the members of the team, they may not be able to quickly reach agreement. One approach to resolving conflicts is to start with a list of all the items on which the sides agree, as opposed to starting with the list of disagreements. This technique can make the sides see that perhaps they are closer together than they thought. Another approach is for each side to articulate the other’s arguments. This technique makes sure both sides understand what the arguments are, even if they don’t agree with some of them. This step can reduce confusion about terms or assumptions, which may be the real cause of the conflict.
Of course, such an approach requires great team dynamics. Everyone on the team should ideally feel psychological safety—the belief that they will not be humiliated for voicing their ideas to the team, even if those ideas might turn out to be wrong. Indeed, a two-year study by Google found that the most effective Google teams weren’t the ones with the most senior engineers or the smartest people, but the teams with high psychological safety. One way Agile teams promote psychological safety is to do a short Retrospective meeting, often shortened to “retro,” at the end of each iteration. A typical format for the retro focuses on Plus/Minus/Interesting (PMI): each team member writes down, perhaps anonymously at first, what they thought went well, went poorly, and was unusual or noteworthy (neither good nor bad) during the iteration.
Postfacto is a free Web-based tool from Pivotal Labs that facilitates retros.
The PMI items are often not technical, for example, “When I brought up my concern about some new code to Armando, I felt he was dismissive about my idea” or “Dave really helped me with a bug I’d been chasing this week without making me feel stupid.” All team members then review the items (and where appropriate reveal their identities, or say “I agree,” or “I noticed that too”), noting especially if some items were raised by more than one team member. The PMI items can also be compared to the previous iteration’s retro items, since one goal of Agile is continuous improvement.
The rest of this chapter focuses on coordinating the work of the team, and in particular the use of version control tools to support coordination.  How is the code repository managed? What happens if team members accidentally make conflicting changes to a set of files? Which lines in a given file were changed, when, and by whom? How does one developer work on a new feature without introducing problems into stable code? How does the team ensure the quality of the code and tests on an ongoing basis as more contributions accrete in the repository? As we will see, when software is developed by a team rather than an individual, version control can be used to address these questions using merging and branching. Both tasks involve combining changes made by many developers into a single code base, a task that sometimes requires manual resolution of conflicting changes.
Summary: SaaS is a good match for two-pizza teams and Scrum, a self-organized small team that meets daily. Two team members take on the additional roles of Scrum Lead, who removes impediments and keeps the team focused, and Product Owner, who speaks for the customer. It can be helpful to follow structured strategies to resolve conflicts when they occur and to reflect on past work in a retrospective meeting.
Coding standards or stylesheets are style guidelines that everyone on the team is expected to follow, usually related to indentation, variable naming, and so on. The goal is to improve the consistency and readability of the code. For example, here is one for Rails. Some projects keep their own coding style guidelines in a document in the project’s main repository; others adhere to guidelines for whichever frameworks or languages the project uses.
True or False: Scrum is an appropriate methodology when it is difficult to plan ahead.
True: Scrum relies more on real-time feedback than on the traditional management approach of central planning with command and control.
When working in an Agile team, be able to give a concise answer (two or three sentences) to the three key questions asked in standups: What have you done since yesterday? What are you planning to do today? Are you facing any impediments or stumbling blocks?
When working in an Agile team, be able to provide examples during a retro of one or more items in each area: Plus, Minus, Interesting.
10.2 Using Branches Effectively
Besides taking snapshots of your work and backing it up, version control also lets you manage multiple versions of a project’s code base simultaneously, for example, to allow part of the team to work on an experimental new feature without disrupting working code, or to fix a bug in a previously-released version of the code that some customers are still using.
Branches are designed for such situations. Rather than thinking of commits as just a sequence of snapshots, we should instead think of a directed, acyclic graph of commits. When a new repo is created, by default it contains only a single branch, usually called the main branch, on which a linear sequence of commits is made.
Prior to June 2020, the main branch was usually called master.
At any point in time, a new branch can be created that “splits off” from any commit of an existing branch, creating a copy of the codebase as it exists at that commit. As soon as a branch is created, that branch and the one from which it was split are separate: commits to one branch don’t affect the other, though depending on project needs, commits in either may be merged back into the other. Indeed, branches can even be split off from other branches, but overly complex branching structures offer few benefits and are difficult to maintain. Finally, unlike a real tree branch, a repo branch can be merged back into another branch later—either the branch from which it split off, or some other branch. A branch can also be deleted, for example, if the project decides to abandon the work-in-progress that branch represents.
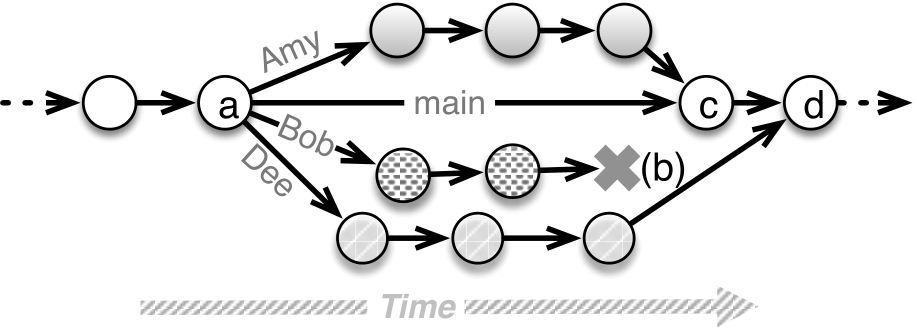
We highlight two common branch management strategies that can be used together or separately, both of which strive to ensure that the main branch always contains a stable working version of the code. Figure 10.2 shows a feature branch, which allows a developer or sub-team to make the changes necessary to implement a particular feature without affecting the main branch until the changes are complete and tested.
Topic branch is a generic term that may refer to feature, release, or bug fix branches.
If the feature is merged into the main branch and a decision is made later to remove it (perhaps it failed to deliver the expected customer value), the specific commits related to the merge of its topic branch can sometimes be undone, as long as there haven’t been many changes to the main branch that depend on the new feature.
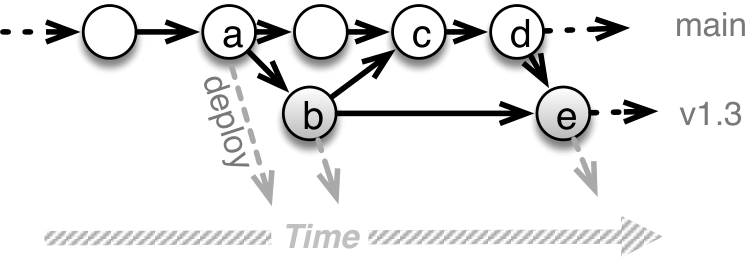
git cherry-pick, since we don’t want to apply any other main branch changes to the release branch except for this fix.
Figure 10.3 shows how release branches are used to fix problems found in a specific release. They are widely used for delivering non-SaaS products such as libraries or gems whose releases are far enough apart that the main branch may diverge substantially from the most recent release branch. For example, the Linux kernel, for which developers check in thousands of lines of code per day, uses release branches to designate stable and long-lived releases of the kernel. Release branches often receive multiple merges from the development or main branch and contribute multiple merges to it. Release branches are less common in delivering SaaS because of the trend toward continuous integration/continuous deployment (Section 1.4): if you deploy several times per week, the deployed version won’t have time to get out of sync with the main branch, so you might as well deploy directly from the main branch. We discuss continuous deployment further in Chapter 12.
Figure 10.4 shows some commands for manipulating Git branches. At any given time, the current branch is whichever one you’re working on in your copy of the repo. Since in general each copy of the repo contains all the branches, you can quickly switch back and forth between branches in the same repo (but see Fallacies and Pitfalls for an important caveat about doing so).
git branch
List existing branches in repo, indicating current branch with*. If you’re usingshor abash-derived shell on a Unix-like system, placing the following in~/.profilewill make the shell prompt display the current Git branch when you’re in a Git repo directory:ch_teams/code/git_prompt.txt
git checkoutname
Switch to existing branch name.git branchname
If branch name exists, switch to it; otherwise create a new branch called name without switching to it. The shortcutgit checkout -bname [commit-id] creates and switches to a new branch based on commit-id, which defaults to most recent commit in the current branch.git push[repo] [branch]
Push the changes (commits) on branch to remote repository repo. (The first time you do this for a given branch, it creates that branch on the remote repo.) With no arguments, pushes the current local branch to the current branch’s remote, or the remote calledoriginby default.git pull[repo] [branch]
Fetches and merges commits from branch branch on the remote repo into your local repo’s current branch (even if the current branch’s name doesn’t match the branch name you’re pulling from—beware!). To fetch a remote branchfoofor which you have no corresponding local branch, first usegit checkout -b footo create a local branch by that name and switch to it, thengit pull origin foo. With no arguments, repo and branch default to the values ofgit config branch.currentbranch.remoteandgit config branch.currentbranch.mergerespectively, which are automatically set up by certain Git commands and can be changed withgit branch --track. If you setup a new repo in the usual way, repo defaults tooriginand branch defaults tomain.git remote show[repo]
If repo omitted, show a list of existing remote repos. If repo is the name of an existing remote repo, shows branches located at repo and which of your local branches are set up to track them. Also shows which local branches are not up-to-date with respect to repo.git mergebranch
Merge all changes from branch into the current branch.git rebasesource-branch
Try to rewrite history as if the current branch had originated from the latest commit on source-branch. You can also specify a specific commit-ID instead of the name of a source branch. Useful in pull requests since it shifts the work of conflict resolution from the target branch’s maintainer to the feature branch’s maintainer.git cherry-pickcommits
Rather than merging all changes (commits) from a given branch, apply only the changes introduced by each of the named commits to the current branch.git checkoutbranch file1 file2…
For each file, merge the differences in branch’s version of that file into the current branch’s version of that file.
Small teams working on a common set of features commonly use a shared-repository model for managing the repo: one particular copy of the repo, referred to as the origin repo, is designated as authoritative, and all developers agree to push their changes to the origin and periodically pull from the origin to get others’ changes.
Many earlier VCSs such as Subversion supported only the shared-repository model of development, and the “one true repo” was often called the master, a term that meant something quite different in Git and was abandoned in 2020 in favor of main.
Famously, Git itself doesn’t care which copy of the repo is authoritative—any developer can pull changes from or push changes to any other developer’s copy of that repo if the repo’s permissions are configured to allow it—but for small teams, it’s convenient (and conventional) for the origin repo to reside in the cloud on a service such as GitHub. Each team member can clone the origin repo onto their development computer, do their work, make their commits on their local clone, and periodically push their commits to the origin. From the point of view of each developer’s local clone, the origin is one of possibly several remote copies of the repo, or simply “remotes.” In the shared-repository model, the origin repo is usually the only remote. Section 10.4 describes scenarios in which there may be multiple remotes.
PaaS (Platform-as-a-Service) deployment servers such as Heroku often appear as a Git remote; pushing code to that remote deploys the pushed version of the app.
ch_teams/code/git_conflict_markers.txt
poem.txt to show a merge conflict. Line 3 marks the beginning of the conflicted region with <<<; everything from there until === (line 5) shows the contents of the file in HEAD (the latest commit in Bob’s local repo) and everything from that point until the end-of-conflict marker >>> (line 7) shows the file as it appears in Amy’s conflicting commit, whose commit-ID is on line 7. Lines 1,2 and 8 were either unaffected or merged automatically by Git.
As Figure 10.4 shows, the git push and git pull commands usually specify which copy of the repository and which branch should be involved in a push or pull operation. If Amy commits changes to her clone of the repo, those changes aren’t visible to her teammate Bob until she does a push and Bob does a pull.
This raises the possibility of a merge conflict scenario. Returning to Figure 10.2, suppose that Dee’s topic branch results in changes to some of the same files as Amy’s topic branch. At the commit marked (c), Amy has successfully merged her changes into the main branch. When Dee tries to push her changes (d), she will initially be prevented from doing so because additional commits have occurred in the origin repo since she last pulled (probably at point (a) when creating her branch). Dee must bring her copy of the repo up-to-date with respect to the origin before she can push her changes. One way to do this is for her to switch back to her main branch, then run git pull origin main to get the latest commits on main from the origin repo; her copy of the repo now looks the same as it did to Amy right after point (c).
git pull actually combines two separate commands: git fetch, which copies new commits from the origin, and git merge, which tries to reconcile the commits with those in the branch on the local clone.
Now Dee can try to merge her topic branch back into the main branch. If Dee’s branch changes different files than Amy’s branch, or if they change different parts of the same file that are far apart, the merge will succeed and Dee can then push her merged main branch back to the shared repo (git push origin main).
But if Dee and Amy had edited parts of the same file that were within a few lines of each other, as in Figure 10.5, Git will conclude that there is no safe way to automatically create a version of the file that reflects both sets of changes, and it will leave a conflicted and uncommitted version of the file with conflict markers (\(<<<\) and \(>>>\)) in Dee’s main branch. Dee must now manually edit that file and add and commit the manually edited version to complete the merge, after which she can push the merged main back to the shared repo. In the next section, we will discuss an alternative process for preventing merge conflicts before they occur. If a merge goes awry, Figure 10.7 provides some mechanisms for partially or fully undoing the results of the merge. Figure 10.8 lists some useful Git commands to help keep track of who did what and when. Figure 10.9 shows some convenient notational alternatives to the cumbersome 40-digit Git commit-IDs.
Finally, don’t overlook the importance of a scratch branch, which is a branch that is never intended to be merged back into the mainline code. You can create a scratch branch to explore code changes such as exploring a spike (Section 7.4) or dry-running a radical change such as upgrading to a major new version of your app framework.
Whichever branches you create, if those branches are pushed to the origin repo, over time the number of branches will grow. GitHub has a user interface for viewing and pruning stale (inactive) branches, which helps keep your codebase manageable.
Summary of branching:
Small teams typically use a “shared-repo” model, in which pushes and pulls use a single authoritative copy of the repo. In Git, the authoritative copy is often referred to as the
originrepo and is stored in the cloud on GitHub or on an internal company server.Branches allow variation in a code base. For example, feature branches support the development of new features without destabilizing working code, and release branches allow fixing bugs in previous releases whose code has diverged from the main line of development. Such branches are collectively called topic branches.
Merging changes from one branch into another (for example, from a topic branch back into the main branch) may result in conflicts that must be manually resolved.
With Agile and SaaS, feature branches are usually short-lived and release branches are uncommon.
Describe a scenario in which merges could go in both directions—changes in a topic branch merged into the main branch, and changes in the main branch merged into a topic branch. (In Git, this is called a crisscross merge.)
Diana starts a new branch to work on a feature. Before she completes the feature, an important bug is fixed and the fix is merged into the main branch. Because the bug is in a part of the code that interacts with Diana’s feature, she merges the fix from main into her own topic branch. Finally, when she finishes the feature, her topic branch is merged back into main.
Describe one or more scenarios in which releasing from a separate release branch is preferable to releasing from the main branch.
Describe several possible workflows for developing new features when using the “deploy from main branch” development methodology.
When working on a new feature, be able to create a branch, do your development and testing on that branch, and merge the changes back to the main branch.
When merging a branch with conflicts, be able to manually repair the conflicts and complete the merge successfully.
List all branches in your repo, and know which branches contain code that has not yet been merged to any other branch.
10.3 Pull Requests and Code Reviews
There is a really interesting group of people in the United States and around the world who do social coding now. The most interesting stuff is not what they do on Twitter, it’s what they do on GitHub.
— Al Gore, former US Vice President, 2013
Section 10.7 describes the use of design reviews or code reviews to improve quality of the software product. You may be surprised to learn that most companies using Agile methods do not perform formal design or code reviews. But perhaps more surprising is that experienced Agile companies’ code is better and more frequently reviewed compared to companies that do formal code reviews.
For the explanation of this paradox, recall the basic idea of extreme programming: every good programming practice is taken to an extreme. Section 2.2 already described one form of “extreme code review” in the form of pair programming, in which the navigator continuously reviews the code being entered by the driver. In this section we describe another form of code review, in which the rest of the team has frequent opportunities to review the work of their colleagues. Our description follows the process used at GitHub, where formal code reviews are rare.
When a developer (or a pair) has finished work on a branch, rather than directly merging the topic branch into the main branch, the developer makes a pull request, or PR for short, asking that the branch’s changes be merged into (usually) the main branch.
Merge request is an alternative name for pull request.
All developers sharing the repo see each PR, and each has the responsibility to determine how merging those changes might affect their own code. If anyone has a concern, an online discussion coalesces around the PR. For example, GitHub’s user interface allows any developer to make comments either on the PR overall or on specific lines of particular files modified by the PR. This discussion might result in changes to the code in question before the PR is accepted and merged; any further changes made on the PR’s topic branch and pushed to GitHub will automatically be reflected in the PR, so the PR process is really a form of code review. And since many PRs typically occur each day, these “mini-reviews” are occurring continuously, so there is no need for special meetings.
The PR therefore serves as a way to focus a code review discussion on a particular set of changes. That said, a PR shouldn’t be opened until the developer is confident their code is ready. Such preparation includes the following:
The PR’s “description” field should provide a well-written explanation of what the proposed code does overall. For example, since PRs are often in support of a particular user story, the PR description could indicate which parts of the necessary functionality are covered by the proposed code.
The code to be merged should be well covered by tests, all of which should be passing. (CHIPS 10.5 describes one way to configure GitHub so that every push to a topic branch automatically triggers a run of the test suite.)
The commit messages should clearly indicate what was changed in each commit. (Since a PR is a request to merge one branch into another, it will often be the case that the branch being merged has had several commits.)
Documentation (design documents, the
READMEfile, the project wiki, and so on) has been updated if necessary to explain new design decisions or changes to important configuration files (such as theGemfilefor Ruby projects).Any temporary or non-essential files that were versioned during development of the code have been removed from version control.
Steps have been taken to eliminate or minimize merge conflicts that will occur when the PR is accepted and merged.
The last item above can be tricky, because as the previous section explained, it’s not uncommon for a merge to encounter conflicts that must be manually resolved. Indeed, when you open a PR, GitHub checks and informs you whether the merge would require manual conflict resolution. If so, there are three ways you can proceed:
Use the GitHub GUI to view the conflicts, and resolve them by editing files either in the GUI or in your development environment, thereby adding commits to the PR that eliminate the conflicts.
Merge the main branch into your topic branch, combining its latest commits with yours (sometimes called a reverse merge). Manually resolve conflicts on your branch and commit the result.
Rebase your topic branch against the main branch, which we describe in more detail below. This option is potentially dangerous if other developers besides you have also been contributing to the topic branch.
Note that we omit the fourth option—let the maintainer of the main branch resolve conflicts when merging the topic branch into main—because it is poor etiquette to create conflict-resolution work for someone from your own contributions. In all three methods above, the responsibility for conflict resolution is with the person who opened the PR (i.e. the feature developer), not the maintainer.
Rebasing is an operation in which you tell Git to make the world look as if you had branched from a later commit. For example, if there have been new commits on main since the time you branched off of it, and you now rebase your branch on top of main, Git will first apply those new commits to the original state of your branch, and then try to apply your own commits. If this process results in conflicts, Git generally requires you to resolve each conflict as it is detected before proceeding with the rebase, and allows you to abort the rebase entirely if things become ugly.
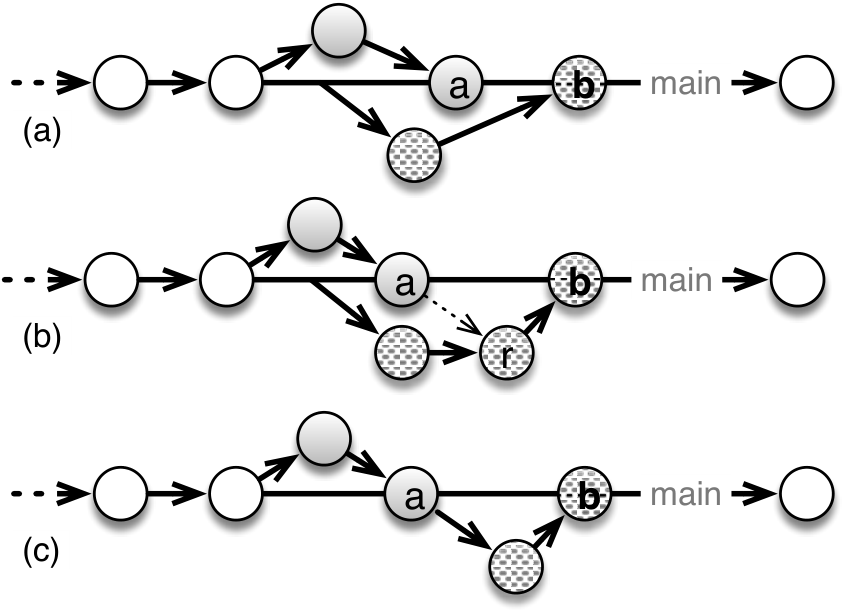
Some developers like rebasing because it creates a “linear history,” as Figure 10.6 shows. But there is an important caveat to rebasing. By its very nature, rebasing rewrites history, by making the world look as if your branch had been created from a different commit than it actually was, and by rewriting the commit history of the branch itself. This rewriting of history can occur in one of three scenarios:
Commit squashing is an optional rebasing step in which the branch’s commits are “squashed” into a single commit that can be easily backed out to undo the effects of merging the PR.
You have not yet pushed to the shared repo. The history of your branch exists only in your copy of the repo, so rewriting that history does not affect the team.
You have pushed to the shared repo, but no one else has made additional changes based on your branch. This is the common case when using branch-per-feature, since there is normally no reason for one developer to base work on another developer’s commits in a topic branch. You may need to use the
--forceflag togit pushwhen pushing the branch, to indicate your acknowledgment that you’re changing the shared repo’s view of history.You have pushed to the shared repo, and others have based work off of your changes. Anyone who has based their work off of your branch commits will now be out of sync since their history doesn’t match the shared repo’s history.
Case 3 is rare, but if it occurs, you should coordinate carefully with your team before forcing a push to avoid others’ repos getting out of sync with the shared copy. One good practice is to construct topic branch names in some way that signals that others should not build off of those commits, for example by prepending the developer’s initials to the branch name or using a standard naming convention such as feature-xxx for feature branch names.
The alternative to rebasing is reverse merging: running git pull origin main in your topic branch at any time will update your clone from the origin repo, then merge any new changes from the main branch into your topic branch. Compared with rebasing, this approach is nondestructive because it doesn’t rewrite history, but it also adds a lot of extra commits (the merge commits) to your topic branch, which can make it tricky to reconstruct the history of the topic branch using git log. Atlassian has an excellent set of tutorials covering this and many other Git-related topics.
All this having been said, if you’re breaking down your user stories into tasks of manageable size (Section 7.4) and doing frequent deployments (Section 12.4), merges and rebases should rarely be painful in Agile development.
Once the PR has been opened, one or more team members should review the PR. GitHub’s user interface allows commenting on the PR as a whole as well as on specific changed lines of code, and the “split view” topic makes it easy to see which specific lines were changed in each file.
Each reviewer—there should be more than one, or reviewers can work as a pair—should first read the description to understand what the code changes are intended to do. If the description is unclear, the developer who opened the PR should amend it.
Once the description is clearly understood, it is helpful to next review the tests, since good tests also serve as documentation of how the code is supposed to behave. Tests are assumed to be passing, or the original developer would not have opened the PR for review.
Finally, the reviewers examine the new or changed code, and (politely) ask for additional explanation wherever needed to understand why the code is written as it is. Frequently, the developer who opened the PR will make additional commits to address reviewers’ comments; the PR will remain open and the new commits will be added to it, and this feedback cycle can continue until the PR is either approved (merged into the main branch) or closed without merging.
git reset --hard ORIG_HEAD
Revert your repo to last committed state just before the merge.git reset --hard HEAD
Revert your repo to last committed state.git checkoutcommit--[file]
Restore a file, or if omitted the whole repo, to its state at commit (see Figure 10.9 for ways to refer to a commit besides its 40-digit SHA-1 hash). Can be used to recover files that were previously deleted usinggit rm.git revertcommit
Reverts the changes introduced by commit. If that commit was the result of a merge, effectively undoes the merge, and leaves the current branch in the state it was in before the merge. Git tries to back out just the changes introduced by that commit without disturbing other changes since that commit, but if the commit happened a long time ago, manual conflict resolution may be required.
git blame[file] |
Annotate each line of a file to show who changed it last and when. |
git diff[file] |
Show differences between current working version of file and last committed version. |
git diffbranch [file] |
Show differences between current version of file and the way it appears in the most recent commit on branch (see Section 10.2). |
git log[ref..ref] [files] |
Show log entries affecting all files between the two commits specified by the refs (which must be separated by exactly two dots), or if omitted, entire log history affecting those files. |
git log --since="date"files |
Show the log entries affecting all files since the given date (examples: "25-Dec-2019", "2 weeks ago"). |
--oneline to produce a compact representation of their reports. If an optional [file] argument is omitted, default is “all tracked files.” Note that all these commands have many more options, which you can see with git helpcommand.
HEAD |
The most recently committed version on the current branch. |
HEAD~ |
The prior commit on the current branch (HEAD~n refers to the n’th previous commit). |
ORIG_HEAD |
When a merge is performed, HEAD is updated to the newly-merged version, and ORIG_HEAD refers to the commit state before the merge. Useful if you want to use git diff to see how each file changed as a result of the merge. |
1dfb2c~2 |
2 commits prior to the commit whose ID has 1dfb2c as a unique prefix. |
"branch@{date}" |
The last commit prior to date (see Figure 10.8 for date format) on branch, where HEAD refers to the current branch. |
git rev-parse expr resolves any of the above expressions into a full commit ID.
Summary of merge management for small teams:
By opening a pull request to merge a topic branch rather than performing the merge directly, the rest of the team is notified of the proposed changes and has a chance to do an on-the-spot code review around the pull request before it is accepted.
In addition to merging the main branch into a topic branch, another way to resolve merge conflicts is rebasing, which rewrites history by “rewinding” a branch to originate from a later commit than it actually does and then trying to apply the branch’s commits.
Because it rewrites history after the fact, rebasing should only be used when you can be sure that no one else has based their additional work on that branch’s commits.
Our advice above has been to open a PR when you’re confident that the code is ready for review, but some teams instead open a PR much earlier as a “draft PR,” as the code is in progress. The requester knows the PR won’t be merged, but this way the rest of the team can comment on the code as it evolves, rather than waiting until it’s fully ready. The PR can remain open as the code evolves in response to comments. Once the PR is judged ready for final review prior to merge, the “draft” designation is removed. The “early draft PR” approach is consistent with the XP philosophy: if code reviews are good, do them as early as possible and on fine-grained evolution of the code. The disadvantage is that it may create additional work for other team members compared to the simpler “Please look over my code now” approach, especially if the developer opening the PR is experienced and unlikely to benefit from very-early-stage code review.
True or false: If you attempt git push and it fails with a message such as “Non-fast-forward (error): failed to push some refs,” this means some file contains a merge conflict between your repo’s version and the origin repo’s version.
Not necessarily. It just means that your copy of the repo is missing some commits that are present in the origin copy, and until you merge in those missing commits, you won’t be allowed to push your own commits. Merging in these missing commits may lead to a merge conflict, but frequently does not.
Describe the important differences between using a reverse merge vs. rebasing to resolve merge conflicts in a pull request.
Reverse merging preserves history and makes conflict resolution somewhat easier since all conflicts arising from the merge are presented at once. Rebasing rewrites history, which may be tricky to manage with collaborators, but makes for a cleaner repo history since it always looks like only one topic branch at a time is ever in progress.
Eliminate merge conflicts in a PR by using git merge to reverse-merge the main branch into your topic branch, manually resolving conflicts in the GitHub GUI (which creates new commits for you) or on the command line (in which case you must explicitly create the commits).
Eliminate merge conflicts in a PR by using git rebase to rebase your topic branch against a later commit on the main branch, manually resolving conflicts on the command line.
10.4 Delivering the Backlog Using Continuous Integration
As Section 7.4 explained, the backlog is the somewhat pessimistic term for the work remaining to be done during the current Agile iteration. That section described how to prioritize and estimate the difficulty of the iteration’s planned work, and briefly introduced the idea of points and velocity as a way to track the work. While there is no single “correct” workflow for Agile teams, in this section we describe a widely-used workflow and suggest best practices for using it effectively. We assume that the stories have already been prioritized and assigned points during an Iteration Planning Meeting, as Section 7.4 described.
The key idea behind delivering the backlog is continuous integration (CI), which minimizes the time between when changes are made on a feature branch and when those changes are merged into the main branch and deployed for customer review. A good CI workflow for Agile two-pizza teams starts with a shared team repo and the use of pull requests to integrate changes from feature branches into the main branch. We introduce two new concepts here that are central to CI. The first is that of a CI service, whose job is to run your complete test suite, usually in the cloud, each time significant changes are made during development of a new feature. The rationale is that while you’re continuously testing the code for the feature you’re developing, you may not be taking the time to run the full test suite, which can take minutes or even tens of minutes for large projects. Somewhat confusingly, such services are usually called CI services, even though technically CI refers not just to running the test suite but to the entire workflow by which changes are integrated into mainline code.  Standalone CI services such as Travis have existed for years, and can be integrated with GitHub so that each time you push, a CI run is triggered. In 2018 GitHub introduced GitHub Actions, which allow automated workflows of various kinds, including CI, to run on GitHub itself whenever a specific event occurs in a repo, such as a push.
A full CI run may include compilation (for compiled languages) and running operational tests (Chapter 12) beyond the scope of the specific feature being developed.
The second concept is that of a staging server, which is configured as similarly as possible to the production server but usually much smaller in scale. The purpose of a staging server is to provide a safe place to deploy new features for customer review before they are deployed in production. The staging server may not even be a specific persistent server like the production server, but an ephemeral one “spun up” just to give the customer the opportunity to see a specific feature in action. A staging server has its own copy of the database containing test data (possibly extracted from real customer data), and is usually off-limits to outside users.
In this workflow, we distinguish two copies of a repo, each of whose main branches is represented by a thick horizontal line in Figure 10.10. Initially, we will describe the workflow from the point of view of the origin repo, which is owned by some team member and shared in the cloud by the team, and some developer’s local clone of the origin. (We will use “developer” to mean either an individual team member or a pair working on a story.) The local repo is created by running git clone with the URL of the origin repo. From the point of view of the local repo, the origin repo is one of possibly several remotes, and usually the default remote when there is more than one. The following numbered steps are keyed to the numbers in the figure, and annotated to indicate the associated state of the story; you can add custom project labels in a tool such as GitHub Projects to keep track of these states.
As Section 7.4 mentioned, 2025 saw the demise of a free Web-based tool, Pivotal Tracker, that supported these tasks particularly well. This discussion is based on Tracker’s support for delivering the backlog.
On the main branch of local, the developer uses
git pull origin mainto ensure she has the most up-to-date version of main.The developer creates a new feature branch for the story (Section 10.2). At this point the story state changes from Unstarted to Started.
The developer writes tests and code for the feature (Chapters 7 and 8), committing frequently. Periodically pushing the feature branch’s commits to the origin repo (
git push originfeature-branch) keeps a copy of the feature branch on the origin repo up-to-date with the one on the local feature branch.This team has their workflow configured so that any push to the origin repo will automatically trigger a CI run on whatever branch was pushed.
When the code and tests are ready, the developer marks the story Finished, and opens a pull request. Note that the PR relates the topic branch on the origin repo to the main branch also on the origin repo, that is, the developer must have pushed the most recent commits on her local topic branch to its counterpart on origin.
Other team members review and comment on the PR (Section 10.3), in this case leading to required changes by the developer, who makes the changes and reopens the PR (or opens a new one).
The revised PR is accepted and the changes are merged into the origin repo’s main branch, triggering another CI run, since the main branch now includes not only this PR but possibly other developers’ PRs that have been merged since Step 1.
Assuming CI passes, the origin’s main branch is deployed to a staging server and the story is marked Delivered. The customer can now review and comment on the new feature. If the customer requests revisions, another round of changes, PR, and merging follows.
With the above workflow, in a team with several developers (or pairs) many stories and feature branches may be “in flight” at the same time.
What happens next depends on which repo is the base repo for the app, that is, the definitive repo from which the production app is released and which is stewarded by the app’s owners. If the development team in question owns the app, then the team’s origin repo may be the app’s base repo as well. But if the app is owned by other developers, then their repo is the base repo, and this team’s origin repo is just used for development. In that case, a pull request can be opened from the origin’s main branch to the base repo’s main branch to merge the changes, and goes through the usual process of review.
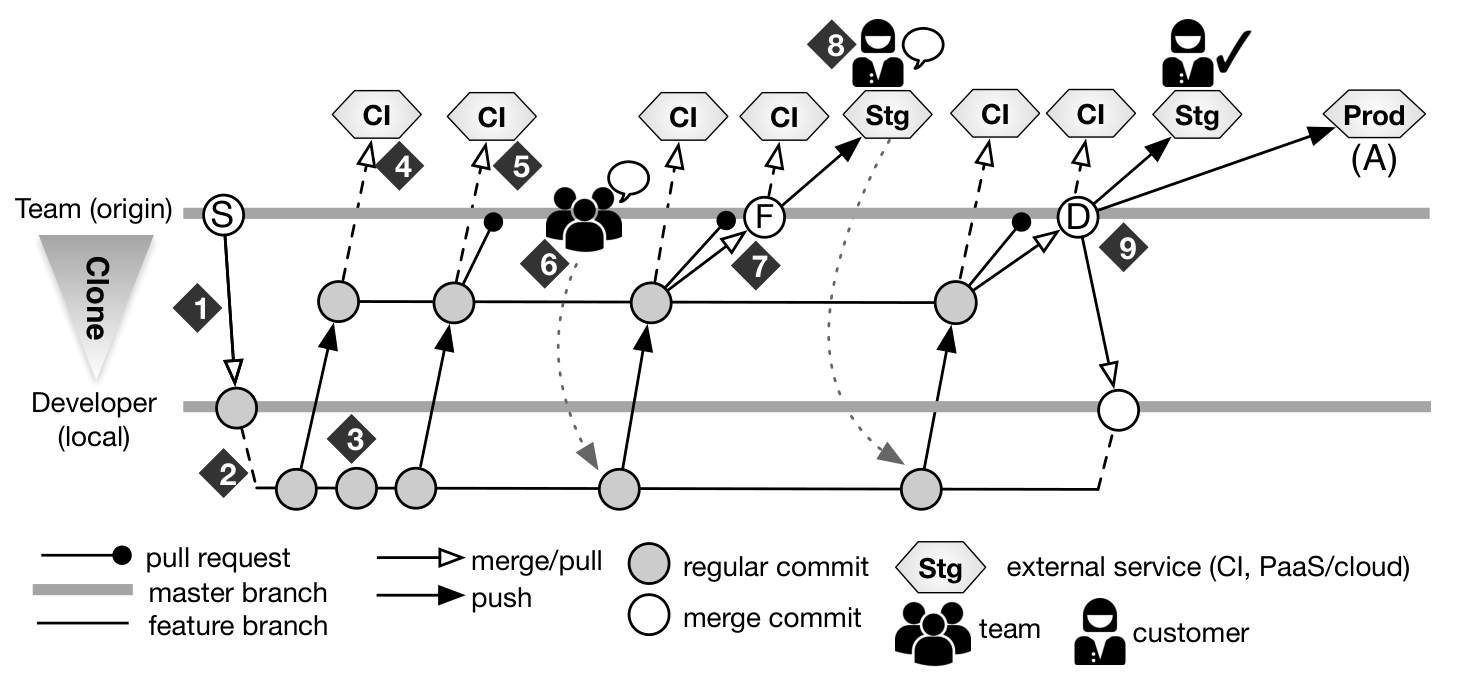
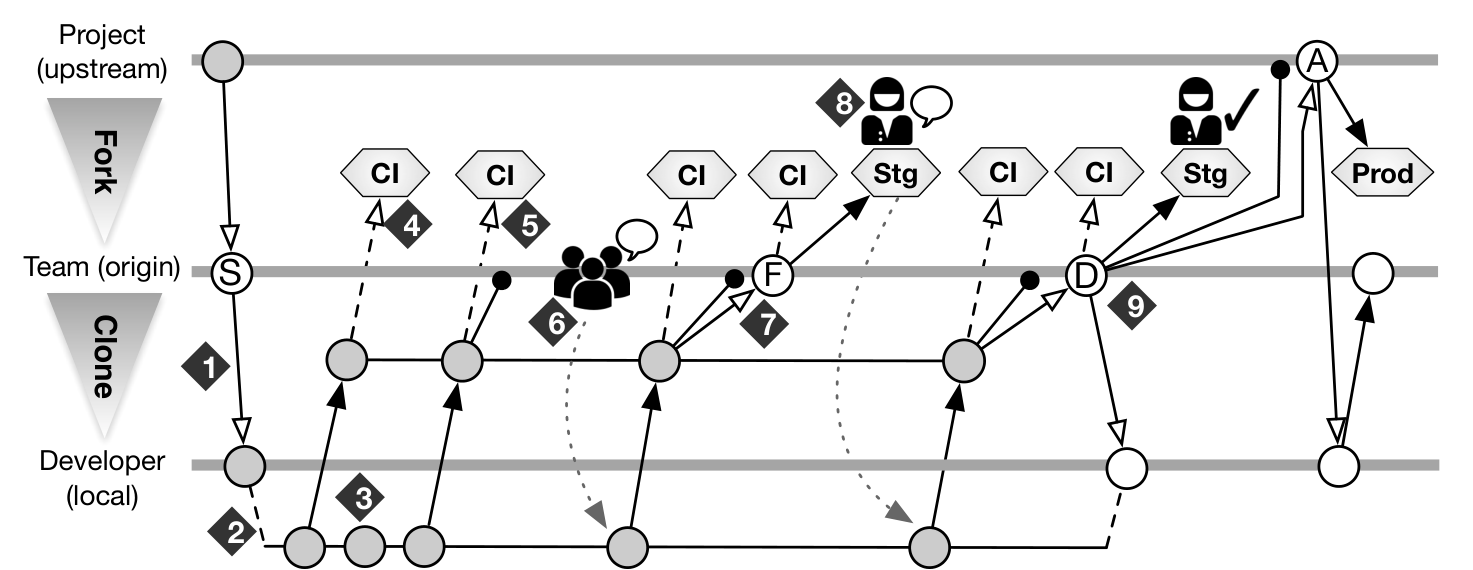
Figure 10.11 shows this “fork-and-pull” collaboration model with the upstream or base repo shown as the top line. The subteam’s origin repo, sometimes also called the head repo, is a fork of the base repo and opens PRs to merge head repo changes into the base repo. Just as feature branch developers may periodically rebase (Section 10.3) against their origin repo’s main branch to get the latest changes and avoid later merge conflicts, the head repo may pull changes from the base repo for the same reason, but because of the way Git works, these changes cannot propagate directly from the base repo on GitHub to its fork. Instead, some developer must pull the changes into their own local copy of the repo, then push the changes to the appropriate branch of the origin repo. The official GitHub tutorial on forking gives detailed steps for keeping a fork up-to-date with an upstream repo, though in your authors’ opinion this alternative tutorial is both clearer and more concise. Figure 10.12 summarizes the branch-per-feature/pull-request workflow.
Fork historically meant a schism in which one team makes a copy of another team’s source code and starts developing it independently, often against the wishes of the original authors. GitHub overloaded the term to mean “creating your own copy of a repo to which you want to contribute but lack push access.”
These workflows should make even more clear why Section 7.4 recommends keeping stories simple: A 1-point story is one whose implementation strategy is mostly known to the team, so it can be delivered quickly and predictably, and if mistakes are made, they can be easily undone with little time being wasted. As with all aspects of Agile, a short cycle with quick feedback is better than spending a lot of time making large changes that carry more uncertainty and risk. A small story also means a simple and short-lived branch, speeding up pull requests and often eliminating the need for rebasing.
Still, no matter how careful your team is, sometimes a pull request may need to be revised before it’s accepted, or the customer may partially reject a feature leading to the branch being modified and the PR being reopened, as both figures show. Such scenarios are part and parcel of Agile development, but to keep your repo clean and your team sane, we recommend mitigating such “loops” by following these best practices for delivering the backlog:
Follow your own advice. The goal of the Iteration Planning Meeting is to determine points and priorities for this iteration. Those decisions should be respected during the iteration, but if they need to be revisited, that should be a team effort rather than a unilateral decision by one developer.
Work on one story at a time. One developer or pair should finish a story before starting stories that require other changes, unless they run into impediments that prevent further progress on delivering that story.
A sustainable pace is more important than total points. Rather than delivering 5 points all at once at the iteration’s end, deliver 1 point per day for 5 days, giving the rest of the team (and the customer) the opportunity to review your contributions as they come in.
Pick a story to implement and mark it “Started”
Create and switch to a new feature branch for the story in your local copy of the repo
Develop code and tests using BDD and TDD on the branch, committing frequently
When the branch is ready for review and all tests are passing, open a pull request
Based on team feedback on the pull request, continue making changes on the branch until all feedback has been addressed
Merge the branch into the main or main branch
Mark the story “Finished”
The story will be marked “Delivered” when it is ready for the customer to try out, and “Accepted” when the customer signs off
Summary of Delivering the Backlog via CI:
Continuous integration is about frequently integrating new code and tests into the mainline. Each integration provides an opportunity to get feedback from the team via “mini code reviews” during pull requests, and from the customer via frequent deployment to a staging server.
Central to CI is the continuous running of tests as code is developed, either using GitHub Actions or an external CI service, automatically each time new code is pushed.
When a subteam is working on features, they may fork the upstream repo and do their teamwork on their development repo, issuing a final pull request to the upstream repo when their own workflow is complete.
CI relies heavily on automation. For example, workflows can be constructed that automatically trigger a testing run optionally followed by automatic deployment to a staging server when commits are pushed to a specific repo or branch.
You can configure your workflow so that CI not only runs automatically on every push, but if the push passes CI, it is automatically deployed to an ephemeral staging server for customer review. This way, both code reviews and customer reviews can occur before the formal merge of the PR integrates these changes into the main branch. Some companies such as Salesforce go even further: if any test fails in CI, the CI tool performs binary searches across recent commits to pinpoint which specific commit introduced a new bug, and automatically opens and assigns a bug report for the developer responsible for that commit ((Hansma 2011)).
Can you think of a scenario in which it makes sense for the team to review a PR for a particular story, but it does not make sense to deploy the story to staging for the customer’s feedback?
Often, a customer-requested feature is broken down into many separate stories, some of which do not result in new functionality visible to the customer, such as adding a new model without yet creating any views for it. The customer’s feedback will be needed as soon as there is a way to interact with the feature, even if incomplete, but not before.
Set up a CI (continuous integration) workflow on the service of your choice that automatically runs the test suite and possibly collects code coverage and maintainability information each time a push occurs.
Describe the sequence of steps in the life cycle of a story, from Unstarted to Accepted.
For each step in the life cycle of a story, describe what action(s) must happen in order to go to the next step.
For each step in the life cycle of a story, describe what action(s), if any, might cause the story to revert to a previous step.
10.5 CHIPS: Agile Iterations
 https://github.com/saasbook/hw-agile-iterations
Perform one or two complete iterations of the Agile lifecycle by planning and tracking features for a SaaS app, adding code and tests for the features, deploying the features to staging and production, and using tools to track test coverage and code quality throughout.
10.6 Reporting and Fixing Bugs: The Five R’s
Inevitably, bugs happen. If you’re lucky, they are found before the software is in production, but production bugs happen too. Everyone on the team must agree on processes for managing the phases of the bug’s lifecycle:
Reporting a bug
Reproducing the problem, or else Reclassifying it as “not a bug” or “won’t be fixed”
Creating a Regression test that demonstrates the bug
Repairing the bug
Releasing the repaired code
Any stakeholder may find and report a bug in server-side or client-side SaaS code. A member of the development or QA team must then reproduce the bug, documenting the environment and steps necessary to trigger it. This process may result in reclassifying the bug as “not a bug” for various reasons:
This is not a bug but a request to make an enhancement or change a behavior that is working as designed
This bug is in a part of the code that is being undeployed or is otherwise no longer supported
This bug occurs only with an unsupported user environment, such as a very old browser lacking necessary features for this SaaS app
This bug is already fixed in the latest version (uncommon in SaaS, whose users are always using the latest version)
Once the bug is confirmed as genuine and reproducible, it’s entered into a bug management system. A plethora of such systems exists, but the needs of many small to medium teams can be met by a tool you’re already using: Pivotal Tracker allows marking a story as a Bug rather than a Feature, which assigns the story zero points but otherwise allows it to be tracked to completion just like a regular user story.
Large projects for widely-used software may use considerably more complex bug tracking systems, such as the open-source Bugzilla.
An advantage of this tool is that Tracker manages the bug’s lifecycle for you, so existing processes for delivering user stories can be readily adapted to fixing bugs. For example, fixing the bug must be prioritized relative to other work; in a waterfall process, this may mean prioritization relative to other outstanding bugs while in the maintenance phase, but in an Agile process it usually means prioritization relative to developing new features from user stories. Using Tracker, the Product Manager can move the bug story above or below other stories based on the bug’s severity and impact on the customer. For example, bugs that may cause data loss in production will get prioritized very high.
“Severity 1” bugs at Amazon.com require the responsible engineers to initiate a conference call within 15 minutes of learning of the bug—a stricter responsiveness requirement than for on-call physicians! ((Ingalls 2006))
The next step is repair, which always begins with first creating the simplest possible automated test that fails in the presence of the bug, and then changing the code to make the test(s) pass green. This should sound familiar to you by now as a TDD practitioner, but this practice is true even in non-TDD environments: no bug can be closed out without a test. Depending on the bug, unit tests, functional tests, integration tests, or a combination of these may be required. Simplest means that the tests depend on as few preconditions as possible, tightly circumscribing the bug. For example, simplifying an RSpec unit test would mean minimizing the setup preceding the test action or in the before block, and simplifying a Cucumber scenario would mean minimizing the number of Given or Background steps. These tests usually get added to the regular regression suite to ensure the bug doesn’t recur undetected. A complex bug may require multiple commits to fix; a common policy in BDD+TDD projects is that commits with failing or missing tests shouldn’t be merged to the main development branch until the tests pass green.
Many bug tracking systems can automatically cross-reference bug reports with the commit-IDs that contain the associated fixes and regression tests. For example, using GitHub’s service hooks, a commit can be annotated with the story ID of the corresponding bug or feature in Tracker, and when that commit is pushed to GitHub, the story is automatically marked as Delivered. Depending on team protocol and the bug management system in use, the bug may be closed out either immediately by noting which release will contain the fix or after the release actually occurs.
As we will see in Chapter 12, in most Agile teams releases are very frequent, shortening the bug lifecycle.
Summary: the 5 R’s of bug fixing
A bug must be reported, reproduced, demonstrated in a regression test, and repaired, all before the bug fix can be released.
No bug can be closed out without an automated test demonstrating that we really understand the bug’s cause.
Bugs that are really enhancement requests or occur only in obsolete versions of the code or in unsupported environments may be reclassified to indicate they’re not going to be fixed.
Why do you think “bug fix” stories are worth zero points in Tracker even though they follow the same lifecycle as regular user stories?
A team’s velocity would be artificially inflated by fixing bugs, since they’d get points for implementing the feature in the first place and then more points for actually getting the implementation right.
10.7 The Plan-And-Document Perspective on Managing Teams
In Plan-And-Document processes, project management starts with the project manager. Project managers are the bosses of the projects:
They write the contract proposal to win the project from the customer.
They recruit the development team from existing employees and new hires.
They typically write team members’ performance reviews, which shape salary increases.
From a Scrum perspective (Section 10.1), they act as Product Owner—the primary customer contact—and they act as Scrum Lead, as they are the interface to upper management and they procure resources for the team.
As we saw in Section 7.10, project managers also estimate costs, make and maintain the schedule, and decide which risks to address and how to overcome or avoid them.
As you would expect for Plan-And-Document processes, project managers must document their project management plan. Figure 10.13 gives an outline of Project Management Plans from the corresponding IEEE standard.
| 1. Project overview | 5.2 Project work plans |
| 1.1 Project summary | 5.2.1 Work activities |
| 1.1.1 Purpose, scope and objectives | 5.2.2 Schedule allocation |
| 1.1.2 Assumptions and constraints | 5.2.3 Resource allocation |
| 1.1.3 Project deliverables | 5.2.4 Budget allocation |
| 1.1.4 Schedule and budget summary | 5.2.5 Procurement plan |
| 1.2 Evolution of the plan | 6. Project assessment and control |
| 2. References | 6.1 Requirements management plan |
| 3. Definitions | 6.2 Scope change control plan |
| 4. Project context | 6.3 Schedule control plan |
| 4.1 Process model | 6.4 Budget control plan |
| 4.2 Process improvement plan | 6.5 Quality assurance plan |
| 4.3 Infrastructure plan | 6.6 Subcontractor management plan |
| 4.4 Methods, tools and techniques | 6.7 Project closeout plan |
| 4.5 Product acceptance plan | 7. Product delivery |
| 4.6 Project organization | 8. Supporting process plans |
| 4.6.1 External interfaces | 8.1 Project supervision and work environment |
| 4.6.2 Internal interfaces | 8.2 Decision management |
| 4.6.3 Authorities and responsibilities | 8.3 Risk management |
| 5. Project planning | 8.4 Configuration management |
| 5.1 Project initiation | 8.5 Information management |
| 5.1.1 Estimation plan | 8.5.1 Documentation |
| 5.1.2 Staffing plan | 8.5.2 Communication and publicity |
| 5.1.3 Resource acquisition plan | 8.6 Quality assurance |
| 5.1.4 Project staff training plan | 8.7 Measurement |
| 8.8 Reviews and audits | |
| 8.9 Verification and validation |
As a result of all these responsibilities, project managers receive much of the blame if projects have problems. Quoting a textbook author from his introduction to project management:
…if a post mortem were to be conducted for every [problematic] project, it is very likely that a consistent theme would be encountered: project management was weak.
— ((Pressman 2010))
We cover four major tasks for project managers to increase their chances of being successful:
Team size, roles, space, communication
Managing people and conflicts
Inspections and metrics
Configuration management
1. Team size, roles, space, and communication. The Plan-and-Document processes can scale to larger sizes, where group leaders report to the project manager. However, each subgroup typically stays the size of the two-pizza teams we saw in Section 10.1. Size recommendations are three to seven people ((Braude and Bernstein 2011)) to no more than ten ((Sommerville 2010)). Fred Brooks gave us the reason in Chapter 7: adding people to the team increases parallelism, but also increases the amount of time each person must spend communicating. These team sizes are reasonable considering the fraction of time spent communicating.
Given we know the size of the team, members of a subgroup in Plan-and-Document processes can be given different roles in which they are expected to lead. For example ((Pressman 2010)):
Configuration management leader
Quality assurance leader
Requirements management leader
Design leader
Implementation leader
One surprising result is that the type of space for the team to work in affects project management. One study found that colocating the team in open space could double productivity ((Teasley et al. 2000)). The reasons include that team members had easy access to each other for both coordination of their work and for learning, and they could post their work artifacts on the walls so that all could see. Another study of teams in open space concludes:
One of the main drivers of success was the fact that the team members were at hand, ready to have a spontaneous meeting, advise on a problem, teach/learn something new, etc. We know from earlier work that the gains from being at hand drops off significantly when people are first out of sight, and then most severely when they are more than 30 meters apart.
— ((Allen and Henn 2006))
While the team relies on email and texting for communicating and shares information in wikis and the like, there is also typically a weekly meeting to help coordinate the project. Recall that the goal is to minimize the time spent communicating unnecessarily, so it is important that the meetings be effective. Below is our digest of advice from the many guidelines found on the Web on how to have efficient meetings. We use the acronym SAMOSAS as a memory device; surely bringing a plate of them will make for an effective meeting!
Samosas are a popular stuffed deep-fried snack from India.

Start and stop meeting on time.
Agenda created in advance of meeting; if there is no agenda, then cancel the meeting.
Minutes must be recorded so everyone can recall results afterwards; the first agenda item is finding a note taker.
One speaker at a time; no interruptions when another is speaking.
Send material in advance, since people read much faster than speakers talk.
Action items at end of meeting, so people know what they should do as a result of the meeting.
Set the date and time of the next meeting.
2. Managing people and conflicts. Thousands of books have been written on how to manage people, but the two most useful ones that we have found are The One Minute Manager ((Blanchard and Johnson 1982)) and How to Win Friends and Influence People ((Carnegie 1998)). What we like about the first book is that it offers short quick advice. Be clear about the goals of what you want done and how well it should be done, but to encourage creativity, leave it up to the team member to decide how to do it. When meeting with individuals to review progress, start with positive feedback to help build their confidence. Then, be honest with them about what is not going well, and what they need to do to fix it. Finally, conclude with positive feedback and encouragement to continue improving their work. What we like about the second book is that it helps teach the art of persuasion, to get people to do what you think should be done without ordering them to do it. These skills also help persuade people you cannot command: your customers and your management.
Both books are helpful when it comes to resolving conflicts within a team. Conflicts are not necessarily bad, in that it can be better to have the conflict than to let the project crash and burn. Intel Corporation labels this attitude constructive confrontation. If you have a strong opinion that a person is proposing the wrong thing technically, you are obligated to bring it up, even to your bosses. The Intel culture is to speak up even if you disagree with the highest ranked people in the room.
If conflict continues, given that Plan-and-Document processes have a project manager, that person can make the final decision. One reason the US made it to the moon in the 1960s is that a leader of NASA, Wernher von Braun, had a knack for quickly resolving conflicts on close decisions. His view was that picking an option arbitrarily but quickly was frequently better, since the choice was roughly 50-50, so that the project could move ahead rather than take the time to carefully collect all the evidence to see which choice was slightly better. (Turing Award winner Butler Lampson’s quote at the beginning of Chapter paraphrases this strategy.)
However, once a decision is made, the teams needs to embrace it and move ahead. The Intel motto for this resolution is disagree and commit: “I disagree, but I am going to help even if I don’t agree.”
3. Inspections and metrics. Inspections like design reviews and code reviews allow feedback on the system even before everything is working. The idea is that once you have a design and initial implementation plan, you are ready for feedback from developers beyond your team. Design and code reviews follow the Waterfall lifecycle in that each phase is completed in sequence before going on to the next phase, or at least for the phases of a single iteration in Spiral or RUP development.
A design review is a meeting in which the authors of program present its design. The goal of the review is to improve software quality by benefiting from the experience of the people attending the meeting. A code review is held once the design has been implemented. This peer-oriented feedback also helps with knowledge exchange within the organization and offers coaching that can help the careers of the presenters.
Shalloway suggests that formal design and code reviews are often too late in the process to make a big impact on the result ((Shalloway 2002)). He recommends to instead have earlier, smaller meetings that he calls “approach reviews.” The idea is to have a few senior developers assist the team in coming up with an approach to solve the problem. The group brainstorms about different approaches to help find a good one.
If you plan to do a formal design review, Shalloway suggests that you first hold a “mini-design review” after the approach has been selected and the design is nearing completion. It involves the same people as before, but the purpose is to prepare for the formal review.
The formal review itself should start with a high-level description of what the customers want. Then give the architecture of the software, showing the APIs of the components. It will be important to highlight the design patterns used at different levels of abstraction (see Chapter 11). You should expect to explain why you made the decisions, and whether you considered plausible alternatives. Depending on the amount of time and the interests of those at the meeting, the final phase would be to go through the code of the implemented methods. At all these phases, you can get more value from the review if you have a concrete list of questions or issues that you would like to hear about.
One advantage of code reviews is that they encourage people outside your team to look at your comments as well as your code. As we don’t have a tool that can enforce the advice from Chapter 9 about making sure the comments raise the level of abstraction, the only enforcing mechanism is the code review.
In addition to reviewing the code and the comments, inspections can give feedback on every part of the project in Plan-and-Document processes: the project plan, schedule, requirements, testing plan, and so on. This feedback helps with verification and validation of the whole project, to ensure that it is on a good course. There is even an IEEE standard on how to document the verification and validation plan for the project, which Figure 10.14 shows.
| 1. Purpose | 5.4 Hardware V&V Processes, Activities and Tasks |
| 2. Referenced documents | 5.4.1 Hardware Concept |
| 3. Definitions | 5.4.2 Hardware Requirements |
| 4. V&V overview | 5.4.3 Hardware Design |
| 4.1 Organization | 5.4.4 Hardware Fabrication |
| 4.2 Top-level schedule | 5.4.5 Hardware Integration Test |
| 4.3 Integrity level scheme | 5.4.6 Hardware Qualification Test |
| 4.4 Resources summary | 5.4.7 Hardware Acceptance Test |
| 4.5 Responsibilities | 5.4.8 Hardware Transition |
| 4.6 Tools, techniques, and methods | 5.4.9 Hardware Operation |
| 5. V&V processes | 5.4.10 Hardware Maintenance |
| 5.1 Common V&V Processes, Activities and Tasks | 5.4.11 Hardware Disposal |
| 5.2 System V&V Processes, Activities and Tasks | 6. V&V reporting requirements |
| 5.2.1 Acquisition Support | 6.1 Task reports |
| 5.2.2 Supply Planning | 6.2 Anomaly reports |
| 5.2.3 Project Planning | 6.3 V&V final report |
| 5.2.4 Configuration Management | 6.4 Special studies reports (optional) |
| 5.2.5 Stakeholder Requirements Definition | 6.5 Other reports (optional) |
| 5.2.6 Requirements Analysis | 7. V&V administrative requirements |
| 5.2.7 Architectural Design | 7.1 Anomaly resolution and reporting |
| 5.2.8 Implementation | 7.2 Task iteration policy |
| 5.2.9 Integration | 7.3 Deviation policy |
| 5.2.10 Transition | 7.4 Control procedures |
| 5.2.11 Operation | 7.5 Standards, practices, and conventions |
| 5.2.12 Maintenance | 8. V&V test documentation requirements |
| 5.2.13 Disposal | |
| 5.3 Software V&V Processes, Activities and Tasks | |
| 5.3.1 Software Concept | |
| 5.3.2 Software Requirements | |
| 5.3.3 Software Design | |
| 5.3.4 Software Construction | |
| 5.3.5 Software Integration Test | |
| 5.3.6 Software Qualification Test | |
| 5.3.7 Software Acceptance Test | |
| 5.3.8 Software Installation and Checkout (Transition) | |
| 5.3.9 Software Operation | |
| 5.3.10 Software Maintenance | |
| 5.3.11 Software Disposal |
Like the algorithmic models for cost estimation (see Section 7.10), some researchers have advocated that software metrics could replace inspections or reviews to assess project quality and progress. The idea is to collect metrics across many projects in an organization over time, establish a baseline for new projects, and then see how the project is doing compared to baseline. This quote captures the argument for metrics:
Without metrics, it is difficult to know how a project is executing and the quality level of the software.
Below are sample metrics that can be automatically collected:
Code size, measured in thousands of lines of code (KLOC) or in function points (Section 7.10).
Effort, measured in person-months spent on project.
Project milestones planned versus fulfilled.
Number of test cases completed.
Defect discovery rate, measured in defects discovered (via testing) per month.
Defect repair rate, measured in defects fixed per month.
Other metrics can be derived from these so as to normalize the numbers to help compare results from different projects: KLOC per person-month, defects per KLOC, and so on.
The problem with this approach is that there is little evidence of correlation between these metrics that we can automatically collect and project outcomes. Ideally, the metrics would correlate and we could have much finer-grained understanding than comes from the occasional and time-consuming inspections. This quote captures the argument de-emphasizing metrics:
However, we are still quite a long way from this ideal situation, and there are no signs that automated quality assessment will become a reality in the foreseeable future.
— ((Sommerville 2010))
4. Configuration management. Configuration management includes four varieties of changes, three of which we have seen before. The first is version control, sometimes also called source and configuration management (SCM), described in Sections 10.2–10.4. This variety keeps track of versions of components as they are changed. The second, system building, is closely related to the first. Tools like make assemble the compatible versions of components into an executable program for the target system. The third variety is release management, which we cover in Chapter 12. The last is change management, which comes from change requests made by customers and other stakeholders to fix bugs or to improve functionality (see Section 9.7).
As you surely expect by now, IEEE has a standard for Configuration Management. Figure 10.15 shows its table of contents.
| Table of Contents |
|---|
| 1. Overview |
| 1.1 Scope |
| 1.2 Purpose |
| 2. Definitions, acronyms, and abbreviations |
| 2.1 Definitions |
| 2.2 Acronyms and abbreviations |
| 3. Tailoring |
| 4. Audience |
| 5. The configuration management process |
| 6. CM planning lower-level process |
| 6.1 Purpose |
| 6.2 Activities and tasks |
| 7. CM management lower-level process |
| 7.1 Purpose |
| 7.2 Activities and tasks |
| 8. Configuration identification lower-level process |
| 8.1 Purpose |
| 8.2 Activities and tasks |
| 9. Configuration change control lower-level process |
| 9.1 Purpose |
| 9.2 Activities and Tasks |
| 10. Configuration status accounting lower-level process |
| 10.1 Purpose |
| 10.2 Activities and tasks |
| 11. CM configuration auditing lower-level process |
| 11.1 Purpose |
| 11.2 Activities and Tasks |
| 12. Interface control lower-level process |
| 12.1 Purpose |
| 12.2 Activities and Tasks |
| 13. Supplier configuration item control lower-level process |
| 13.1 Purpose |
| 13.2 Activities and Tasks |
| 14. Release management lower-level process |
| 14.1 Purpose |
| 14.2 Activities and tasks |
Summary: In Plan-and-Document processes:
Project managers are in charge: they write the contract, recruit the team, and interface with the customer and upper management.
The project manager documents the project plan and configuration plan, along with the verification and validation plan that ensures that other plans are followed!
To limit time spent communicating, groups are three to ten people. They can be composed into hierarchies to form larger teams reporting to the project manager, with each group having its own leader.
Guidelines for managing people include giving them clear goals but empowering them, and starting with the positive feedback in reviews but being honest about shortcomings and how to overcome them.
While conflicts need to be resolved, they can be helpful in finding the best path forward for a project.
Inspections like design reviews and code reviews let outsiders give feedback on the current design and future plans. Such reviews allow the team to benefit from the experience of others. They are also a good way to check if good practices are being followed and if the plans and documents are sensible.
Configuration management is a broad category that includes change management while maintaining a product, version control of software components, system building of a coherent working program from those components, and release management to ship the product to customers.
Compare the size of teams in Plan-and-Document processes versus Agile processes.
Plan-and-Document processes can form hierarchies of subgroups to create a much larger project, but each subgroup is basically the same size as a “two-pizza” team for Agile.
True or False: Design reviews are meetings intended to improve the quality of the software product using the wisdom of the attendees, but they also result in technical information exchange and can be highly educational for junior members of the organization, whether presenters or just attendees.
True.
10.8 Fallacies and Pitfalls
The main theme of Fred Brooks’s classic book, The Mythical Man-Month, is that not only does adding people not help, it makes it worse. The reason is twofold: it takes a while for new people to learn about the project, and as the size of the team grows, the amount of communication increases, which can reduce the time available for people to get their work done. His summary, which some call Brooks’s Law, is:
Adding manpower to a late software project makes it later.
— Fred Brooks, Jr.
It’s less common than it used to be to divide the team into a front-end specialist, back-end specialist, customer liaison, and so forth, but it still happens. Your authors and others believe that better results come from having each team member deliver all aspects of a chosen feature or story—Cucumber scenarios, RSpec tests, views, controller actions, model logic, and so on. Especially when combined with pair programming, having each developer maintain a “full stack” view of the product spreads architectural knowledge around the team.
Programmers are optimists. When we set out to change our code, we always think it will be a one-line change. Then it turns into a five-line change; then we realize the change affects another file, which has to be changed as well; then it turns out we need to add tests or change existing tests that relied on the old code; and so on. For this reason, always create a feature branch when starting new work. Branching with Git is nearly instantaneous, and if the change truly does turn out to be small, you can delete the branch after merging to avoid having it clutter your branch namespace.
If you create a new file but forget to add it to the repo, your copy of the code will still work but when others pull your changes your code won’t work for them. Use git status regularly to see the list of Untracked Files, and use the .gitignore file to avoid being warned about files you never want to track, such as binary files or temporary files.
If a file isn’t required to run the code, it probably shouldn’t be in the repo: temporary files, binary files, log files, and so on should not be versioned. If files of test data are versioned, they should be part of a proper test suite. Files containing sensitive information such as API keys should never be checked into GitHub in plaintext (i.e. without encryption). If the files must be checked in, they should be encrypted.
If you do a pull or a merge, or if you switch to a different branch, some files may suddenly have different contents on disk. If any such files are already loaded into your editor, the versions being edited will be out of date, and even worse, if you now save those files, you will either overwrite merged changes or save a file that isn’t in the branch you think it is. The solution is simple: before you pull, merge or switch branches, make sure you commit all current changes; after you pull, merge or switch branches, reload any files in your editor that may be affected—or to be really safe, just quit your editor before you commit. Be careful too about the potentially destructive behavior of certain Git commands such as git reset.
It’s best not to let your copy of the repo diverge too far from the origin, or merges (Section 10.2) will be painful. You should update frequently from the origin repo before starting work, and if necessary, rebase incrementally so you don’t drift too far away from the main branch.
Branches are a great way for different team members to work on different features simultaneously, but without frequent merges and clear communication of who’s working on what, you risk an increased likelihood of merge conflicts and accidental loss of work when one developer “resolves” a merge conflict by deleting another developer’s changes.
Git makes it quick and easy to do a commit, so you should do them frequently and make each one small, so that if some commit introduces a problem, you don’t have to also undo all the other changes. For example, if you modified two files to work on feature A and three other files to work on feature B, do two separate commits in case one set of changes needs to be undone later. In fact, advanced Git users use git add with specific files, rather than git add . which adds every file in the current directory, to “cherry pick” a subset of changed files to include in a commit. And don’t forget that no one else will see the commit until you use git push to propagate them to the team’s origin repo.
10.9 Concluding Remarks: From Solo Developer to Teams of Teams
The first 90% of the code accounts for the first 10% of the development time. The remaining 10% of the code accounts for the other 90% of the development time.
— Tom Cargill, quoted in Programming Pearls, 1985
The history of version control systems mirrors the movement towards distributed collaboration among “teams of teams,” with two-pizza teams emerging as a popular unit of cohesiveness. From about 1970–1985, the original Unix Source Code Control System (SCCS) and its longer-lived descendant Revision Control System (RCS) required the repo and all development to stay on the same computer (which might be a multi-user system) and disallowed simultaneous editing of the same file by different developers. The Concurrent Versions System (CVS) and Subversion introduced simultaneous editing and branches, but only a single repo. Git completed the decentralization by allowing any copy of a repo to push or pull from any other, enabling completely decentralized “teams of teams,” and by making branching and merging much quicker and easier than its predecessors. Today, distributed collaboration is the norm: rather than a large distributed team, fork-and-pull allows a large number of Agile two-pizza teams to make independent progress, and the use of Git to support such efforts has become ubiquitous. The two-pizza team size makes it easier for a team to stay organized than the giant programming teams possible in Plan-and-Document. The decentralized approach also distributes responsibility for project planning and cost esimation more than P&D, which relies on the project manager to make the time and cost estimates, assess risks, and to run the project so that it delivers the product on time and on budget with the required functionality.
We have previously seen two examples of processes in which the P&D and Agile versions comprise the same skills and steps, but sequenced differently. Test-driven development uses the same elements as conventional code writing followed by debugging, but in a different order. Agile iterations include the same elements as a waterfall project, but in a different order. Team coordination is a third example: Agile teams use the same processes as P&D teams—releases, code reviews, customer reviews, cost and effort estimation, assignment of different parts of the coding task to different developers—but in a different order. Agile proponents believe the techniques in this chapter can help an agile team avoid many of the pitfalls that have made software projects infamous for being late and over budget. Checking in continuously with other developers (via PRs) and customers (via frequent deployments to staging) during each iteration guides your team into spending its resources most effectively and is more likely to result in software that makes customers happy within the time and cost budget. A disciplined workflow using version control allows developers to make progress on many fronts simultaneously without interfering with each others’ work, and also allows disciplined and systematic management of the bug lifecycle.
Finally, as with any experience, you should reflect on what went well, what didn’t go well, and what you would do differently. It is not a sin to make a mistake, as long as you learn from it; the sin is making the same mistake repeatedly. Many Agile teams’ end-of-iteration Retrospective meeting allows this learning to happen incrementally each week and makes the team more cohesive over time, rather than waiting until the end of a long project to determine what could have gone better.
For more comprehensive details on this chapter’s topics, we recommend these resources:
You can find very detailed descriptions of Git’s powerful features in Version Control With Git ((Loeliger 2009)), which takes a more tutorial approach, and in the free Git Community Book, which is also useful as a thorough reference on Git. For detailed help on a specific command, use
git helpcommand, for example,git help branch; but be aware that these explanations are for reference, not tutorial.Atlassian has an excellent set of tutorials covering many Git-related topics, including rebasing.
Many medium-sized projects that don’t use Pivotal Tracker, or whose bug-management needs go somewhat beyond what Tracker provides, rely on the Issues feature built into every GitHub repo. The Issues system allows each team to create appropriate “labels” for different bug types and priorities and create their own “bug lifecycle” process.