6.6. Events and Callbacks
So far all of our DOM manipulation has been by typing JavaScript commands directly. As you’ve no doubt guessed, much more interesting behaviors are possible when DOM manipulation can be triggered by user actions. As part of the JSAPI for the DOM, browsers allow attaching JavaScript event handlers to the user interface: when the user performs a certain UI action, such as clicking a button or moving the mouse into or out of a particular HTML element, you can designate a JavaScript function that will be called and have the opportunity to react. This capability makes the page behave more like a desktop UI in which individ- ual elements respond visually to user interactions, and less like a static page in which any interaction causes a whole new page to be loaded and displayed.
Figure 6.9 summarizes the most important events defined by the browser’s native JSAPI and improved upon by jQuery. While
some are triggered by user actions on DOM elements, others relate to the operation of the browser itself or to “pseudo-UI”
events such as form submission, which may occur via clicking a Submit button, pressing the Enter key (in some browsers),
or another JavaScript callback causing the form to be submitted. To attach a behavior to an event, simply provide a
JavaScript function that will be called when the event fires. We say that this function, called a callback or event handler,
is bound to that event on that DOM element. Although events are automatically triggered by the browser, you can also trigger
them yourself: for example, e.trigger(’click’) triggers the click event
handler for element e. As we will see in Section 6.8, this ability is useful when testing: you can simulate user interaction
and check that the correct changes are applied to the DOM in response to a UI event.
Browsers define built-in behavior for some events and elements: for example, clicking on a link visits the linked page. If
such an element also has a programmer-supplied click handler, the handler runs first; if the handler returns a truthy value
(Figure 6.2), the built-in behavior runs next, but if the handler returns a falsy value, the built-in behavior is suppressed.
What if an element has no handler for a user-initiated event, as is the case for images? In that case, its parent element in
the DOM tree is given the chance to respond to the event handler. For example, if you click on an img element inside a div
and the img has no click handler, then the div will receive the click event. This process continues until some element handles
the event or it “bubbles” all the way up to the top-level window, which may or may not have a built-in response depending on
the event.
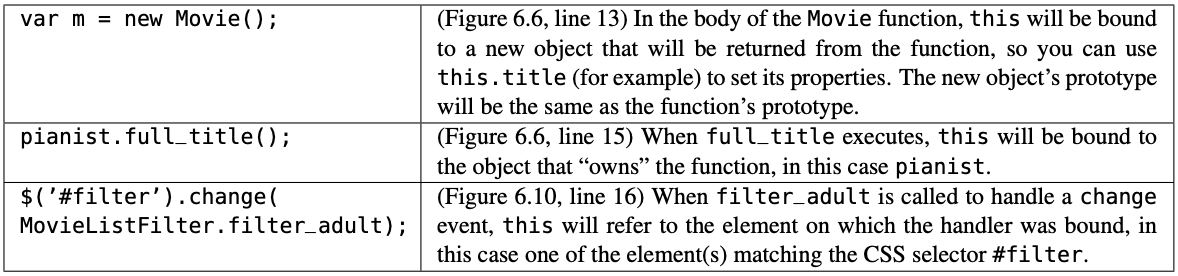
Our discussion of events and event handlers motivates the third common use of JavaScript’s this keyword (recall that Section 6
.3 introduced the first two uses). When an event is handled, in the body of the event handler function, jQuery will arrange
for this to refer to the element to which the handler is attached (which may not be the element that originally received the
event, if the event “bubbled up” from a descendant). However, if you were programming without jQuery, the value of this in an
event handler is the global object (document.window), and you have to examine the event’s data structure (usually passed as
the final argument to the handler) to identify the element that handled the event. Since han- dling events is such a common
idiom, and most of the time an event handler wants to inspect or manipulate the state of the element on which the event was
triggered, jQuery is written to explicitly set this to that DOM element.
Putting all these pieces together, Figure 6.10 shows the client-side JavaScript to imple- ment a checkbox that, when checked, will hide any movies with ratings other than G or PG. Our general strategy for JavaScript can be summarized as:
Identify the DOM elements we want to operate on, and make sure there is a convenient and unambiguous way of selecting them using
$().Create the necessary JavaScript functions to manipulate the elements as needed. For this simple example we can just write them down, but as we’ll see in Section 6.8, for AJAX or more complex functions we will use TDD (Chapter 8) to develop the code.
Define a setup function that binds the appropriate JavaScript functions to the elements and performs any other necessary DOM manipulation.
Arrange to call the setup function once the document is loaded.
 1let MovieListFilter = {
 2    filter_adult: function () {
 3        // 'this' is *unwrapped* element that received event (checkbox)
 4        if ($(this).is(':checked')) {
 5        $('.adult').hide();
 6        } else {
 7        $('.adult').show();
 8        };
 9    },
10    setup: function() {
11        // construct checkbox with label
12        let labelAndCheckbox =
13        $('<label for="filter">Only movies suitable for children</label>' +
14            '<input type="checkbox" id="filter"/>' );
15        labelAndCheckbox.insertBefore('#movies');
16        $('#filter').change(MovieListFilter.filter_adult);
17    }
18}
19$(MovieListFilter.setup); // run setup function when document ready
For Step 1, we modify our existing Rails movie list view to attach the CSS class adult
to any table rows for movies rated other than G or PG. All we have to do is change line 12
of the Index template (Figure 4.5) as follows, thereby allowing us to write $(’.adult’) to
select those rows:
<div class="row<%= (' adult' unless movie.rating =~ /^G|PG$/) %>">
For Step 2, we provide the function filter_adult, which we will arrange to be called whenever the checkbox is
checked or unchecked. As lines 4–8 of Figure 6.10 show, if the checkbox is checked, the adult movie rows are
hidden; if unchecked, they are revealed. Recall from Figure 6.8 that :checked is one of jQuery’s built-in behaviors
for checking the state of an element. Remember also that jQuery selectors such as $(’.adult’) generally return a
collection of matching elements, and actions like hide() are applied to the whole collection.
Why does line 4 refer to $(this) rather than just this? The mechanism by which user interactions are dispatched to
JavaScript functions is part of the browser’s JSAPI, so the value of this is the browser’s representation of the
checkbox (the element that handled the event). In order to use the more powerful jQuery features such as is(’:checked’),
we have to “wrap” the native element as a jQuery element by calling $ on it in order to give it these special powers.
The first row of Figure 6.12 shows this usage of $.
For Step 3, we provide the setup function, which does two things. First, it creates a label and a checkbox (lines 12–14),
using the $ mechanism shown in the second row of Figure 6.12, and inserts them just before the movies table (line 15).
Again, by creating a jQuery element we are able to call insertBefore on it, which is not part of the browser’s built-in
JSAPI. Most jQuery functions such as insertBefore return the target object itself, allowing “chaining” of function calls as we’ve seen in Ruby.
Second, the setup function binds the filter_adult function to the checkbox’s change handler. You might have expected to
bind to the checkbox’s click handler, but change is more robust because it’s an example of a “pseudo-UI” event: it fires
whether the checkbox was changed by a mouse click, a keypress (for browsers that have keyboard navigation turned on, such
as for users with disabilities that prevent use of a mouse), or even by other JavaScript code. The submit event on forms
is similar: it’s better to bind to that event than to bind to the click handler on the form-submit button, in case the
user submits the form by hitting the Enter key.
Why didn’t we just add the label and checkbox to the Rails view template? The reason is our design guideline of graceful degradation: by using JavaScript to create the checkbox, legacy browsers will not render the checkbox at all. If the checkbox was part of the view template, users of legacy browsers would still see the checkbox, but nothing would happen when they clicked on it.
Why does line 16 refer to MovieListFilter.filter_adult? Couldn’t it just refer to filter_adult? No, because that would imply
that filter_adult is a variable name visible in the scope of the setup function, but in fact it’s not a variable name at
all—it’s just a function-valued property of the object MovieListFilter, which is a (global) variable. It is good JavaScript
practice to create one or a few global objects to “encapsulate” your functions as properties, rather than writing a bunch
of functions and polluting the global namespace with their names.
The last step is Step 4, which is to arrange for the setup function to be called. For historical reasons, JavaScript
code associated with a page can begin executing before the entire page has been loaded and the DOM fully parsed. This
feature was more important for responsiveness when browsers and Internet connections were slower. Nonetheless, we usually
want to wait until the page is finished loading and the entire DOM has been parsed, or else we might be trying to bind
callbacks on elements that don’t exist yet! Line 19 does this, adding MovieListFilter.filter_adult to the list of functions
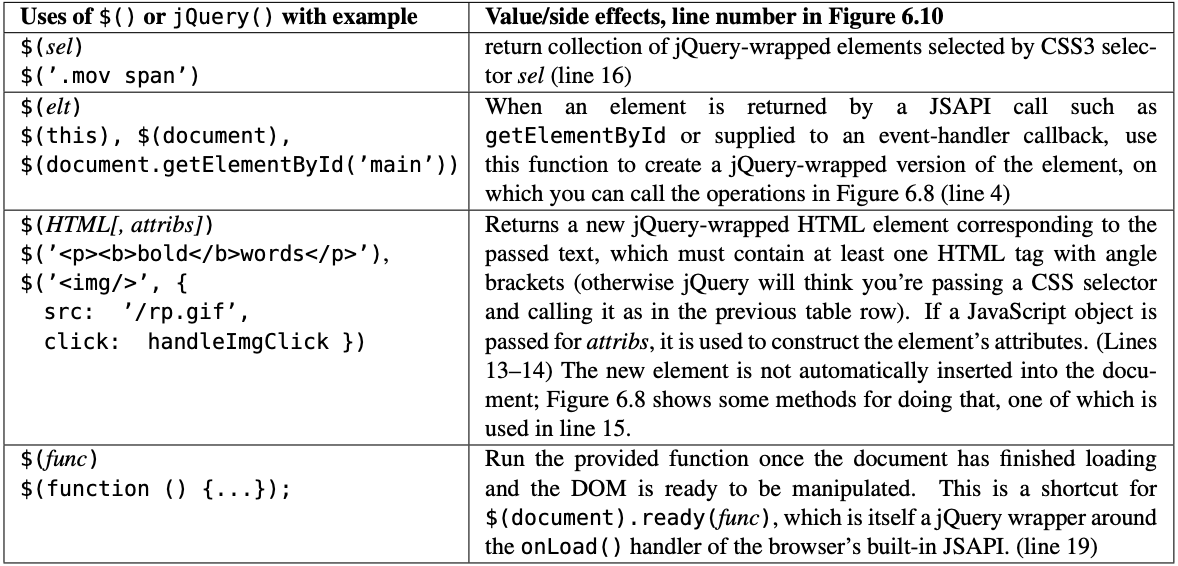
to be executed once the page is finished loading, as the last row of Figure 6.12 shows. Since you can call $() multiple
times to run multiple setup functions, you can keep each file’s setup function together with that file’s functionality,
as we’ve done here. To run this example place all the code from Figure 6.12 in app/assets/javascripts/movie_list_filter.js.
This was a dense example, but it illustrates the basic jQuery functionality you’ll need for many UI enhancements. The figures
and tables in this section generalize the techniques introduced in the example, so it’s worth spending some time perusing
them. In particular, Figure 6.12 summarizes the four different ways to use jQuery’s $, all of which we’ve now seen.
Finally, most of jQuery’s events are based on the built-in events recognized by browsers, but you can also define your own
custom events and use trigger to trigger them, and many jQuery-based libraries do just that. For example, Bootstrap’s plugin
for showing a modal window defines a custom event show that is generated when a modal window is displayed and another custom
event shown that is generated when that window is dismissed. Your own code can listen for these events in order to take
actions before or after the modal is displayed. In your own code, you might enclose menus for month and day in a single
outer element such as a div, and then define a custom update event on the div that checks that the month and day are
compatible. You could then isolate the checking code in a separate event handler for update, and use trigger to call it
from within the change handlers for the individual
month and day menus. This is one way that custom handlers help DRY out your JavaScript code.
Self-Check 6.6.1. Explain why calling $(selector) is equivalent to calling $(window.document).find(selector).
documentis a property of the browser’s built-in global object (window) that refers to the browser’s representation of the root of the DOM. Wrapping the document element using$gives it access to jQuery functions such asfind, which locates all elements matching the selector that are in the subtree of its target; in this case, the target is the DOM root, so it will find any matching elements in the entire document.
Self-Check 6.6.2. In Self-Check 6.6.1, why did we need to write $(document).find rather than document.find ?
document, also known aswindow.document, is the browser’s native representation of the document object. Since find is a jQuery function, we need to “wrap” document to give it special jQuery powers.
Self-Check 6.6.3. What would happen if we omitted the last line of Figure 6.10, which arranges to call the setup function?
The browser would behave like a legacy browser without JavaScript. The checkbox wouldn’t be drawn (since that happens in the
setupfunction) and even if it were, nothing would happen when it was clicked, since the setup function binds our JavaScript handler for the checkbox’schangeevent.